1 - Setting up an MAA
Tutorial for setting up Dovecot as an MAA server
This tutorial will use dovecot (2.3), a tried-and-tested MAA for Linux. A manual can be found here.
Installation
sudo apt-get update
# Install dovecot with IMAP and POP3 support, as well as the sieve plugin for filtering emails.
sudo apt-get install -y dovecot-imapd dovecot-pop3d dovecot-sieve
Make sure that dovecot is running well using the command:
sudo service dovecot status
Reloading configuration
dovecot is configured using a number of config files found under /etc/dovecot. When any of these are changed, dovecot must be reloaded using
sudo service dovecot reload
for the changes to take effect.
Configuring users
dovecot makes use of several users, as detailed here, but we are primarily interested in configuring mail users.
Mail users are accounts which have a mailbox on the mail server. Mail sent to <mailbox-name>@<domain-name> where <domain-name> is the domain name of your mail server will typically be routed to the mailbox of the user with username <mailbox-name>.
SMTP servers can also be set up with aliasing, so that multiple <mailbox-name>s map to a single mail user. So for example the server can be set up in such a way that any mail sent to either postmaster@markmizzi.dev or root@markmizzi.dev will end up in the mailbox of user root.
dovecot is quite flexible when it comes to configuring mail users but typically one of two options is used:
- System users where each mail user has their own system user in
/etc/passwd. - Virtual users where all mail users run under a single system user and are managed by
dovecot itself.
System users are generally recommended for security as the Linux installation will make sure that different users cannot access each other’s mailboxes (without any required configuration on the part of the sys admin). For this reason we will stick to system users in this tutorial.
dovecot is configured with user and password databases for user management. A user database is a method for storing, managing and retreiving mail users, while a password database is a method for storing passwords and authenticating users.
User database
For system users, the user database is always the /etc/passwd file. In order to make sure that dovecot is configured to use this user database, open /etc/dovecot/conf.d/auth-system.conf.ext and ensure that it contains the following lines:
# System users (NSS, /etc/passwd, or similar). In many systems nowadays this
# uses Name Service Switch, which is configured in /etc/nsswitch.conf.
userdb {
  # <doc/wiki/AuthDatabase.Passwd.txt>
  driver = passwd

  # Extra options go here...
}
Make sure as well that there are no other userdb {} clauses in the config file.
For more options on configuring how dovecot accesses the /etc/passwd file, see here.
By default user lookup is performed using special auth worker processes. If the /etc/passwd file is small and local this may add extra overhead that is unneeded. dovecot can be configured to perform the lookup in-process:
userdb {
  # <doc/wiki/AuthDatabase.Passwd.txt>
  driver = passwd
  # [blocking=no]
  args = blocking=no
}
New users can be created using the usual commands for Linux:
sudo useradd -m <username>
sudo usermod -L <username>
Users created with these commands will have a home directory to store their mailbox in Maildir format, but cannot login on the mail server. Preventing login ensures that users cannot access and edit their own mails on the server, thus corrupting dovecot state.
Note that existing users on the mail server will be treated as mail users as well. Extra care should be taken to ensure that such users do not access and corrupt their mailbox directly through an ssh session. Such users should also have a password configured for their mail which is different from their login password on the mail server, as IMAP and POP3 clients often share unencrypted passwords over the internet. See here for more details.
For more details on user databases in general see here.
Password database
If configured with system users, dovecot can be set up to use the same password for the mail as the system password for the system user corresponding to a particular mail user. If this is required, then there are three different password databases to choose from:
- PAM: Most commonly used in Linux and BSDs nowadays.
- BSDAuth: BSD authentication is used by OpenBSD.
- Passwd: System users (NSS, /etc/passwd, or similar). This may work instead of PAM (mostly in some BSDs).
However, we do not recommend this approach, as mail passwords can be shared unencrypted over the internet by IMAP and POP3 clients, often without warning. We therefore recommend configuring dovecot to use non-system passwords as mail passwords, and encouraging mail users to use different mail and system passwords.
In our case, we will use passwd-file as our password database. This is a file which replicates /etc/passwd, but contains actual passwords, unlike /etc/passwd in most modern UNIX-like systems. Since we are using the file to simply look up passwords, we can also omit most fields normally found in /etc/passwd, so that the passwd-file we use consists of lines with the following format
<mail-username>:<password>
<password> is not the plaintext password but is a special storage format for passwords. The format used can be specified by a password scheme; dovecot supports multiple.
In order to specify that we want to use the passwd-file password database, as well as to specify where the file will be stored and what password scheme will be used, make sure that /etc/dovecot/conf.d/auth-system.conf.ext contains the following clause:
passdb {
  # specify passwd-file as our password database
  driver = passwd-file

  # Arguments specific to the password database we are using.
  # In our case we are specifying that the password scheme we want to use is Blowfish crypt (blf-crypt),
  # and that the passwd-file is stored at /usr/local/etc/passwd.replica
  args = scheme=blf-crypt /usr/local/etc/passwd.replica
  default_fields =
  override_fields =

  # If yes, used to provide denied users database
  # (In our case a denied user would be a system user who is not allowed to have a mailbox).
  # If the user is found from the passdb, the authentication will fail.
  deny = no

  # If yes, used to provide Master users/passwords.
  # The users listed in the master passdb can log in as other users.
  master = no
  pass = no

  # Do we sometimes want to skip over this passdb?
  # This is only useful when there are multiple passdbs
  skip = never
  mechanisms =
  username_filter =

  # What to do if authentication failed
  result_failure = continue
  # What to do if the passdb lookup had an internal failure
  result_internalfail = continue
  # What to do if the authentication succeeded
  result_success = return-ok

  # v2.2.24+
  auth_verbose = default
}
and that there are no other passdb {} clauses. For more details on general configuration of the passdb {} clause, see here. For more details on specific arguments which can be passed to args= when driver=passwd-file, see here.
Note also that multiple passwd-files can be specified as indicated here; this can be especially useful if the MAA server is being used to service multiple domain names, as it would allow mail users to have seperate passwords depending on the domain.
For more details on password databases in general see here.
Generating and storing passwords in a passwd-file
System administrators need to populate a passwd-file manually with passwords for all mail users. This can be done using the following command:
printf "<mail-username>:`doveadm pw -s BLF-CRYPT -p '<password>'`\n" | sudo tee -a /usr/local/etc/passwd.replica
which uses the doveadm tool to convert a password to a stored format according to the specified scheme (in this case Blowfish crypt or BLF-CRYPT), and then stores the <mail-username>:<password> pair in the specified passwd-file (in this case /usr/local/etc/passwd.replica).
For more information on using doveadm pw see here.
Specifying multiple password databases
It’s worth noting that dovecot is flexible enough to use multiple password databases. This works by specifying multiple passdb {} clauses. dovecot will then try every password database in the order in which they are declared in /etc/dovecot/conf.d/auth-system.conf.ext. The result_failure=, result_internalfail= and result_success= parameters in a passdb {} clause dictate how/whether authentication is delegated to the next password database in the case of an authentication failure, an internal failure, and an authentication success respectively.
They can be set to the following values:
return-ok: Return success, don’t continue to the next passdb.return-fail: Return failure, don’t continue to the next passdb.return: Return earlier passdb’s success or failure, don’t continue to the next passdb. If this was the first passdb, return failure.continue-ok: Set the current authentication state to success, and continue to the next passdb. The following passdbs will skip password verification.continue-fail: Set the current authentication state to failure, and continue to the next passdb. The following passdbs will still verify the password.continue: Continue to the next passdb without changing the authentication state. The initial state is failure. If this was set in result_success, the following passdbs will skip password verification.
There are also two special cases to mention when using multiple password databases. If the deny= option in a passdb {} clause is set to yes, that password database will be used as the denied users database. In our case, these are system users which we do not want to be mail users. Authentication of such users against the denied users database will always fail. Denied users databases should be placed at the top of /etc/dovecot/conf.d/auth-system.conf.ext, before any other password databases, and they should always be used in conjunction with other password databases so that system users intended to also be mail users can also be authenticated.
Another special case occurs when the master= option in a passdb {} clause is set to yes. In this case the password database will be used for master users, i.e. special users who can login as any other mail user in the system.
The mailbox format used determines how emails are stored on disk. dovecot supports the following mailbox formats:
| Name | Tag | Description |
|---|
| obox | obox | OX Dovecot Pro object storage mailbox format. (Pro only) |
| mbox | mbox | Traditional UNIX mailbox format. Users’ INBOX mailboxes are commonly stored in /var/spool/mail or /var/mail directory. Single file contains multiple messages. |
| Maildir | maildir | One file contains one message. A reliable choice since files are never modified and all operations are atomic. The top-level Maildir directory contains the Maildir/cur, Maildir/new, and Maildir/tmp subdirectories. |
| dbox | sdbox | single-dbox, one message per file. Dovecot’s own high performance mailbox format. Messages are stored in one or more files, each containing one or more messages. |
| dbox | mdbox | multi-dbox, multiple messages per file. Dovecot’s own high performance mailbox format. Messages are stored in one or more files, each containing one or more messages. |
| imapc | imapc | Use remote IMAP server as mail storage. |
| pop3c | pop3c | Use remote POP3 server as mail storage. |
For this tutorial we will use the Maildir format. For a technical overview of this format and the way in which dovecot implements it, see here.
Mailbox formats and related configuration is stored in /etc/dovecot/conf.d/10-mail.conf; this file should also contains lots of information about the available settings in comments by default.
For the purposes of this tutorial it is sufficient to set mail_location= to the following
mail_location = maildir:~/Maildir:LAYOUT=fs
in this configuration file. With this set, a mail user’s mailboxes (and hence all their emails) will be stored under ~/Maildir where ~ is the corresponding system user’s home directory. The LAYOUT=fs part of the setting ensures that hierarchal directories are used for mailboxes, as specified here.
For more configuration related to Maildir, see here.
For more details on how dovecot supports mailboxes, see here
Client protocols and Encryption
MAA clients (embedded into user agent programs such as Thunderbird) fetch mail from MAA servers using one of two popular protocols: IMAP and POP3.
When IMAP is used, the MAA client stores only the subject line and sender name locally. The email body is stored indefinitely on the mail server (in the mailbox), and is requested on demand from the MAA server when the end user opens the email.
POP3 is an alternative, less flexible protocol where the entire email is downloaded onto and stored by the MAA client from the MAA server, and then deleted on the mail server’s mailbox. This means that a particular email can typically only be downloaded from a single client, and mail cannot be synced across multiple clients belonging to the same mail user. It carries the advantage that the mail server does not need to store emails indefinitely, however, and hence might be useful if the mail server manages a large number of users who each use only a single client. It might also be more secure than IMAP in certain situations, as it is harder for an attacker to access emails if the mail server is compromised.
For more details about IMAP and POP3 see here.
See also our reference material on email.
Configuring IMAP
Configuration related to the IMAP protocol is stored in /etc/dovecot/conf.d/20-imap.conf. By default this file also contains lots of information in comments about the available settings. For our purposes, this configuration file can be left as is.
Configuring POP3
Configuration related to the POP3 protocol is stored in /etc/dovecot/conf.d/20-pop3.conf. By default this file also contains lots of information in comments about the available settings. For our purposes, this configuration file can be left as is.
Configuring DNS
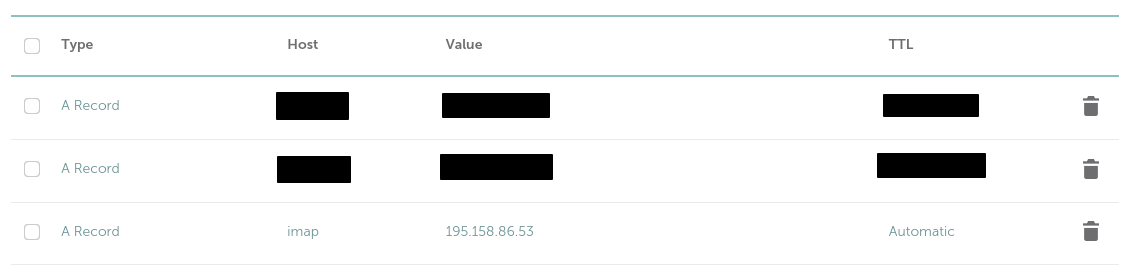
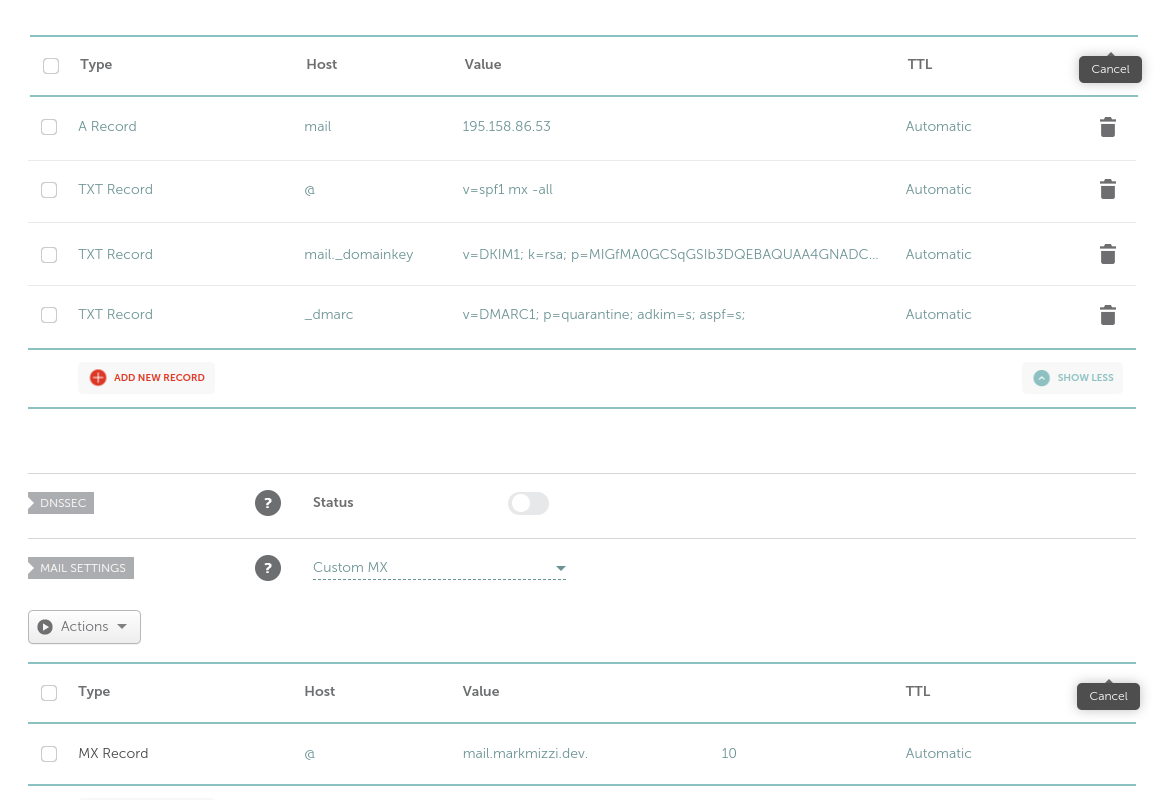
If you wish to use the MAA server over the Internet, it is recommended to give it a DNS name. Conventionally this is imap.<domain-name> where <domain-name> is the DNS name you want to use in email addresses. You can create an A record in your DNS management software which connects this DNS name to the MAA server’s public IP address. For example my configuration for this on Namecheap is:
Note that to use an MAA server over the internet, you also need to configure an appropriate SSL certificate and port forwarding rules (see below).
Configuring SSL
SSL needs to be configured in order to use encrypted versions of IMAP and POP3; this is highly recommended when using your MAA server over the Internet.
SSL configuration for dovecot is stored in the config file /etc/dovecot/conf.d/10-ssl.conf.
The main settings of interest are the following:
# SSL/TLS support: yes, no, required. <doc/wiki/SSL.txt>
ssl = yes

# PEM encoded X.509 SSL/TLS certificate and private key. They're opened before
# dropping root privileges, so keep the key file unreadable by anyone but
# root. Included doc/mkcert.sh can be used to easily generate self-signed
# certificate, just make sure to update the domains in dovecot-openssl.cnf
ssl_cert = </etc/dovecot/private/dovecot.pem
ssl_key = </etc/dovecot/private/dovecot.key
By default SSL is enabled. The ssl_key= option specifies the private key to be used in SSL decryption, while the ssl_cert= option is a (by default self-signed) certificate associating the corresponding public key with the MDA server’s local hostname.
When using the MAA server over the internet, the default certificate must be replaced by one signed by a well known, trusted CA that also contains the server’s DNS name. A certificate can easily be obtained using certbot; this uses the Let’s Encrypt CA:
sudo certbot certonly --manual --preferred-challenges dns -d imap.<domain-name> --email <admin-email> --agree-tos
Certbot will prompt you to create a DNS TXT record in order to confirm that the domain belongs to you; follow the instructions and wait a few minutes before pressing Enter, as it will take some time for the DNS changes to propagate. Once the challenge has succeeded, certbot will indicate that a certificate and a key have been generated and are available at some location. For example, in my case it showed these details:
Successfully received certificate.
Certificate is saved at: /etc/letsencrypt/live/imap.markmizzi.dev/fullchain.pem
Key is saved at:         /etc/letsencrypt/live/imap.markmizzi.dev/privkey.pem
This certificate expires on 2024-12-18.
These files will be updated when the certificate renews.

NEXT STEPS:
- This certificate will not be renewed automatically. Autorenewal of --manual certificates requires the use of an authentication hook script (--manual-auth-hook) but one was not provided. To renew this certificate, repeat this same certbot command before the certificate's expiry date.

- - - - - - - - - - - - - - - - - - - - - - - - - - - - - - - - - - - - - - - -
If you like Certbot, please consider supporting our work by:
 * Donating to ISRG / Let's Encrypt:   https://letsencrypt.org/donate
 * Donating to EFF:                    https://eff.org/donate-le
- - - - - - - - - - - - - - - - - - - - - - - - - - - - - - - - - - - - - - - -
Note the certificate expiration date; certificates must be renewed using the certbot command shown above when they expire. Certbot will send an email reminder to <admin-email> when the certificate has almost expired.
Note also the locations of the certificate and the key (in my case /etc/letsencrypt/live/imap.markmizzi.dev/fullchain.pem and /etc/letsencrypt/live/imap.markmizzi.dev/privkey.pem respectively). Create symbolic links from these locations to /etc/dovecot/private/dovecot.pem and /etc/dovecot/private/dovecot.key, e.g. I would run
sudo ln -f -s /etc/letsencrypt/live/imap.markmizzi.dev/fullchain.pem /etc/dovecot/private/dovecot.pem
sudo ln -f -s /etc/letsencrypt/live/imap.markmizzi.dev/privkey.pem /etc/dovecot/private/dovecot.key
Note that these symbolic links do not need to be re-created when renewing certificates if Certbot places the newly created certificate and key in the same locations.
It is also possible to configure SSL in several other ways, such as having different certificates and keys depending on the protocol (IMAP or POP3), IP address, or DNS name of the MAA server. In addition, it is also possible to require certificates from email clients for additional security. A full guide to SSL configuration of dovecot can be found here.
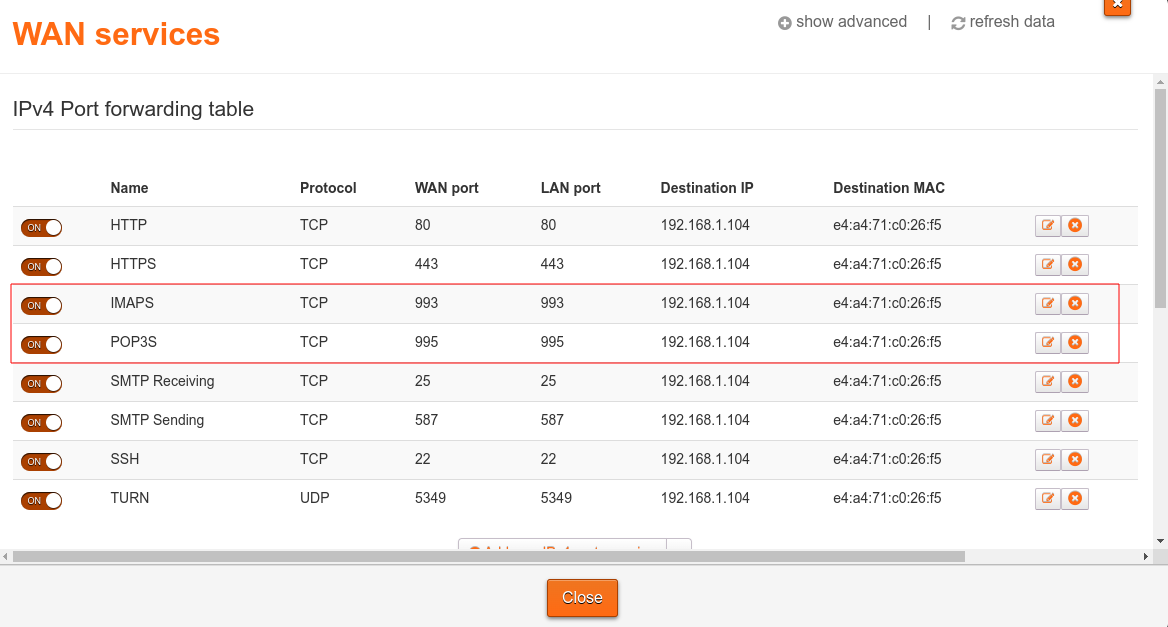
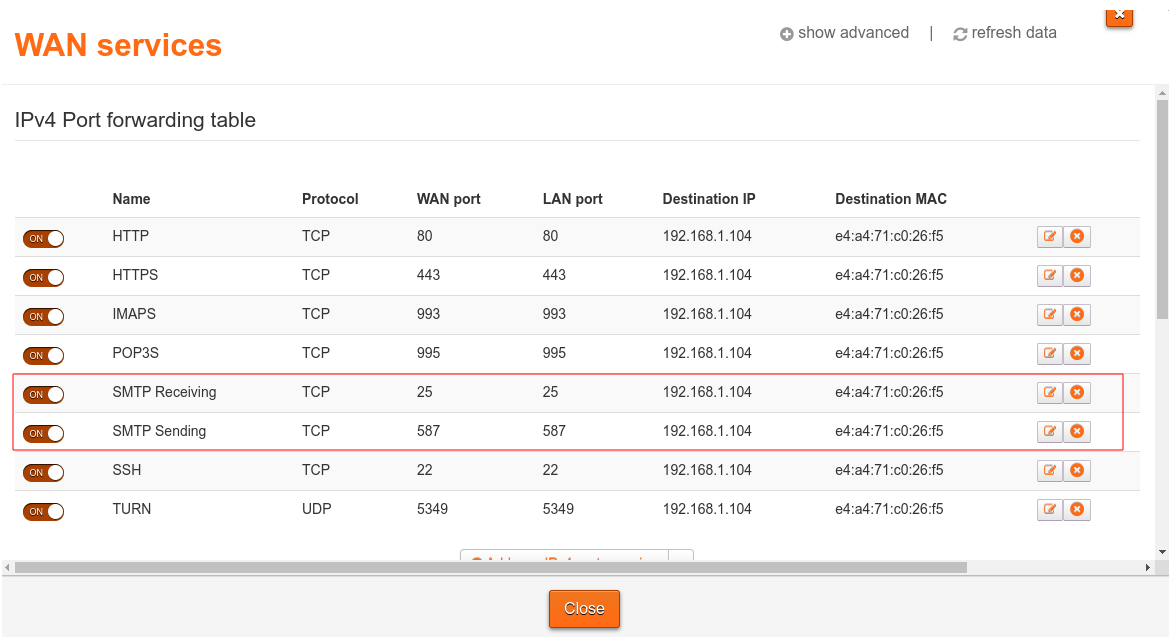
Port forwarding on the router
If the MAA server needs to be used over the internet, ports used by the IMAP and POP3 protocol need to be made public using port forwarding at the router.
IMAP and POP3 use ports 143 and 110 respectively. However, these are unencrypted versions of the protocol which send data in plaintext form, and so it is not recommended to use them over the Internet. Instead the encrypted versions of these protocols, IMAPS and POP3S should be used. These use ports 993 and 995 respectively.
Port forwarding is managed via a table which can be edited through the router interface (this is usually available by accessing the largest local IP address on your local network, e.g. for me it is available at http://192.168.1.254).
Here are my port forwarding rules as an example of what a setup could look like:
Debugging
Logging for mail services (both MTA and MDA processes) is available at /var/log/mail.log. Use
cat /var/log/mail.log | grep dovecot
to filter for dovecot logging.
2 - Setting up an MTA
Tutorial for setting up Postfix as an MTA server
An MTA server is responsible for actually sending and receiving emails. It does this via the Simple Mail Transfer Protocol (SMTP). User agent programs (such as Thunderbird) send mail by communicating with an MTA server via SMTP. Incoming email is received by the MTA server from other MTAs using SMTP, and then stored in the appropriate user mailbox where the MAA server can access it and make it available to MAA clients.
For more information on the SMTP protocol, see here or see our reference material on email.
As an MTA, we will use postfix.
Milters (portmanteau for mail filters) are special programs which are used to filter received or sent emails. They can be used with the postfix and sendmail MTAs, and communicate with them over TCP. The MTA server informs and provides data about each stage of the email receipt/sending to milters, and milter programs can choose to terminate sending/receiving the email at any point.
It is recommended to configure postfix with some milter programs (see Setting up DKIM and Spam filters).
Installation
sudo apt-get update
sudo apt-get install -y postfix
When prompted with this screen:
  ┌───────────────────────────┤ Postfix Configuration ├───────────────────────────┐
  │ Please select the mail server configuration type that best meets your needs.  │
  │                                                                               │
  │  No configuration:                                                            │
  │   Should be chosen to leave the current configuration unchanged.              │
  │  Internet site:                                                               │
  │   Mail is sent and received directly using SMTP.                              │
  │  Internet with smarthost:                                                     │
  │   Mail is received directly using SMTP or by running a utility such           │
  │   as fetchmail. Outgoing mail is sent using a smarthost.                      │
  │  Satellite system:                                                            │
  │   All mail is sent to another machine, called a 'smarthost', for              │
  │   delivery.                                                                   │
  │  Local only:                                                                  │
  │   The only delivered mail is the mail for local users. There is no            │
  │   network.                                                                    │
  │                                                                               │
  │ General mail configuration type:                                              │
  │                                                                               │
  │                           No configuration                                    │
  │                           Internet Site                                       │
  │                           Internet with smarthost                             │
  │                           Satellite system                                    │
  │                           Local only                                          │
  │                                                                               │
  │                                                                               │
  │                     <Ok>                         <Cancel>                     │
  │                                                                               │
  └───────────────────────────────────────────────────────────────────────────────┘
choose Internet Site as the configuration that should be installed.
Then enter the domain name you want to use in your email addresses in the following screen:
 ┌────────────────────────────┤ Postfix Configuration ├────────────────────────────┐
 │ The 'mail name' is the domain name used to 'qualify' _ALL_ mail addresses       │
 │ without a domain name. This includes mail to and from <root>: please do not     │
 │ make your machine send out mail from root@example.org unless root@example.org   │
 │ has told you to.                                                                │
 │                                                                                 │
 │ This name will also be used by other programs. It should be the single, fully   │
 │ qualified domain name (FQDN).                                                   │
 │                                                                                 │
 │ Thus, if a mail address on the local host is foo@example.org, the correct       │
 │ value for this option would be example.org.                                     │
 │                                                                                 │
 │ System mail name:                                                               │
 │                                                                                 │
 │ _______________________________________________________________________________ │
 │                                                                                 │
 │                      <Ok>                          <Cancel>                     │
 │                                                                                 │
 └─────────────────────────────────────────────────────────────────────────────────┘
To check that it is running correctly, use:
sudo service postfix status
Reloading configuration
postfix is configured mainly through a single config file at /etc/postfix/main.cf. After configuration changes, postfix needs to be reloaded with:
sudo service postfix reload
in order for the changes to take effect.
Basic Configuration
Ensure that /etc/postfix/main.cf contains the following:
# public DNS name of this MTA server
myhostname = mail.<domain-name>

# The list of domains that are delivered via the $local_transport mail delivery transport.
# In other words this is the list of domains for which postfix will send/receive mail
mydestination = mail.<domain-name>, <domain-name>, localhost, localhost.localdomain

# The next-hop destination(s) for non-local mail
# In this case we do not want to use postfix as a relay, so we leave it empty
relayhost =

# The list of "trusted" remote SMTP clients that have more privileges than "strangers".
# In particular, "trusted" SMTP clients are allowed to relay mail through Postfix.
# We limit these to local clients only.
# NOTE that I don't think this value matters for our setup.
mynetworks = 127.0.0.0/8 [::ffff:127.0.0.0]/104 [::1]/128

# The maximal size of any local individual mailbox or maildir file, or zero (no limit).
mailbox_size_limit = 0

# The set of characters that can separate an email address localpart, user name, or a
# .forward file name from its extension.
#
# For example, with "recipient_delimiter = +", the software tries user+foo@example.com
# before trying user@example.com, user+foo before trying user, and .forward+foo before
# trying .forward.
recipient_delimiter = +

# The local network interface addresses that this mail system receives mail on.
# Specify "all" to receive mail on all network interfaces (default)
inet_interfaces = all

# specify that received mail should be stored using Maildir format, this matches our dovecot installation.
# Each mail user will have a mailbox at ~/Maildir.
home_mailbox = Maildir/
Receiving mail
We need to specify recipients (the part before @ in an email address) to postfix so that it knows how to route incoming mail to the right mail user’s mailbox. Up until now we have treated mail users and recipients as interchangeable, but postfix allows for multiple recipients to map to the same mail user. This means that emails sent to postmaster@markmizzi.dev and root@markmizzi.dev, for e.g. may both be routed into the root user’s mailbox.
To specify recipients, we use the following configuration parameter:
local_recipient_maps = proxy:unix:passwd.byname $alias_maps
proxy:unix:passwd.byname ensures that each system user in /etc/passwd is also a recipient; this is important as our dovecot setup assumes that each system user is also a mail user. This option hence ensures that mail can be sent to each mail user defined in dovecot’s user database, using their username as the recipient.
$alias_maps are optional lookup tables that are searched in order to determine the mail user corresponding to a particular recipient.
Because of the order in which we specified the options, the /etc/passwd file will be searched first.
One file in $alias_maps by default is /etc/aliases, which we can modify to map recipients to mail users. These are some common mappings added:
mailer-daemon: postmaster
postmaster: root
nobody: root
hostmaster: root
usenet: root
news: root
webmaster: root
www: root
ftp: root
abuse: root
With this setup emails sent to postmaster@<domain-name>, www@<domain-name>, abuse@<domain-name>, and so on will all be routed to root’s mailbox.
Architecturally, Postfix consists of several daemon processes which can be configured under /etc/postfix/master.cf. One of the processes which can (and should) be configured is an SMTP server for receiving mail; this listens on port 25 by default.
Open /etc/postfix/master.cf and underneath
# ==========================================================================
# service type  private unpriv  chroot  wakeup  maxproc command + args
#               (yes)   (yes)   (no)    (never) (100)
# ==========================================================================
add the following:
smtp      inet  n       -       y       -       -       smtpd
  -o syslog_name=postfix/smtp
  -o smtpd_tls_security_level=encrypt
The postfix installation will probably have a similar process defined already in /etc/postfix/master.cf make sure to delete any duplicates.
The process defined above will listen for incoming mail at port 25, in addition we also override some options in /etc/postfix/main.cf using the -o flag:
syslog_name sets the name used when logging to /var/log/mail.log; we set this to something unique so we can easily filter logs if needed.smtpd_tls_security_level: Setting this to encrypt means that our server will only accept incoming mail if this is sent over an encrypted (TLS) channel.
Sending mail
We must define an additional process in /etc/postfix/master.cf for submitting mail to be sent; this listens at port 587 by default. In addition, we want to restrict who can send mail from our server to users which have mail users configured in dovecot’s user database.
We can do this by defining the following process in /etc/postfix/master.cf:
submission inet n - n - - smtpd
  -o syslog_name=postfix/submission
  -o smtpd_tls_security_level=encrypt
  -o smtpd_sasl_auth_enable=yes
  -o smtpd_sasl_type=dovecot
  -o smtpd_sasl_path=private/auth
  -o smtpd_sasl_security_options=noanonymous
  -o smtpd_client_restrictions=permit_sasl_authenticated,reject
  -o smtpd_sender_restrictions=reject_authenticated_sender_login_mismatch
  -o smtpd_sender_login_maps=hash:/etc/postfix/sender_login
  -o smtpd_recipient_restrictions=reject_non_fqdn_recipient,reject_unknown_recipient_domain,permit_sasl_authenticated,reject
The new options used and their meanings are:
smtpd_sasl_auth_enable enables SASL; this is a generic autentication framework used to authenticate users sending mail with SMTP.
smtpd_sasl_type specifies the SASL plug in that the postfix SMTP server should use for authentication. In our case we will use dovecot’s user database to provide authentication, and hence we specify dovecot as the plugin.
smtpd_sasl_path contains some implementation-specific information that the postfix SMTP server passes to the SASL plugin; in our case it is a path to a local file that will also be specified in the dovecot configuration (see below). The SMTP server and the SASL provider (in our case dovecot) can use this file to communicate any configuration information.
smtpd_sasl_security_options determines SASL security options. In our case we set noanonymous to disable unauthenticated clients that can send mail as “guests”.
smtpd_client_restrictions specify a list of optional restructions that the SMTP server applies in the context of a client connection request. In our case we set permit_sasl_authenticated,reject which allows SASL authenticated clients and rejects all other client connections.
smtpd_sender_restrictions specifies optional restrictions that the Postfix SMTP server applies in the context of a client MAIL FROM command. In our case we enable reject_authenticated_sender_login_mismatch which ensures that the email address given in the MAIL FROM command is owned by the mail user sending the email.
smtpd_sender_login_maps is a set of optional lookup tables with the SASL login names that own MAIL FROM addresses. We specify hash:/etc/postfix/sender_login, meaning that the file /etc/postfix/sender_login is used as a lookup table. You must create this file and put inside it one line for each email address and each mail user such that the mail user can send emails with MAIL FROM set to that email address in the following format:
<email-address> <mail-username>
For example my /etc/postfix/sender_login file contains the following:
mark@markmizzi.dev mark
root@markmizzi.dev root
postmaster@markmizzi.dev root
noreply@markmizzi.dev noreply
postfix uses an indexed version of this file, which must be created using
sudo postmap hash:/etc/postfix/sender_login
Re-run this command every time you change /etc/postfix/sender_login.
smtpd_recipient_restrictions species optional restrictions that the Postfix SMTP server applies in the context of a client RCPT TO command. In our case we don’t allow clients to send mail to email addresses that (1) do not have a fully qualified domain name (reject_non_fqdn_recipient), (2) that have a domain with an unknown mail server, i.e. no valid MX or A DNS records for a mail server (reject_unknown_recipient_domain), and (3) we allow the request when the client is SASL authenticated (permit_sasl_authenticated).
dovecot needs to be configured with an authentication service for postfix to be able to use it to authenticate clients that want to send mail with SASL; this can be done by adding
  unix_listener /var/spool/postfix/private/auth {
    group = postfix
    mode = 0660
    user = postfix
  }
within the service auth {} block in /etc/dovecot/conf.d/10-master.conf. Note that this only works when postfix and dovecot are running on the same machine. See here for details on making this work if this is not the case for you.
Make sure that /etc/dovecot/conf.d/10-auth.conf contains the following lines:
# Outlook and Windows Mail works only with LOGIN mechanism, not the standard PLAIN:
auth_mechanisms = plain login
As mentioned above, postfix can be configured with many more daemon processes in /etc/postfix/master.cf. For an overview of the postfix architecture and how it uses these various daemon processes, see here
For more about configuring /etc/postfix/master.cf, see here, or run man 5 master on the system with your postfix installation.
Configuring DNS
I found this article helpful while writing this section.
The MTA server requires certain DNS records in order to operate correctly over the Internet. These are:
An A record linking the MTA server’s public IP address to a DNS name, conventionally mail.<domain-name> where <domain-name> is the domain you wish to use in your e-mail addresses.
An MX record linking <domain-name> to the MTA server’s DNS name defined in the previous record, e.g. mail.<domain-name>. MX records define MTA servers associated with a particular <domain-name>. A particular <domain-name> can have more than one MX record linking to multiple MTA servers; this can be used to implement failovers.
A Sender Policy Framework (SPF) record to define which IP addresses are allowed to send mail from <domain-name>. This is needed in order to prevent e-mail spoofing, as by default any IP address can send mail for <domain-name>. Detailed information on how to configure SPF records can be found here. A simple configuration that works is to define a TXT record for <domain-name> with the value v=spf1 mx -all; this allows mail servers linked to <domain-name> by MX records to send mail on behalf of <domain-name>, and prohibits all other IP addresses.
A Domain-based Message Authentication, Reporting and Conformance (DMARC) record determines what happens to an email after it is checked against SPF and DKIM records. The DMARC policy determines if a check failure results in the email being marked as spam, getting blocked, or being delivered to its intended recipient. DMARC records are TXT records for _dmarc.<domain-name> with the content defining the intended behaviour. In our case, we will set the content to
v=DMARC1; p=quarantine; adkim=s; aspf=s;
where each of these fields means the following:
v=DMARC1 indicates that this TXT record contains a DMARC policy and should be interpreted as such by email servers.p=quarantine indicates that email servers should “quarantine” emails that fail DKIM and SPF: considering them to be potentially spam. Other possible settings for this include p=none, which allows emails that fail to still go through, and p=reject, which instructs email servers to block emails that fail.adkim=s means that DKIM checks are “strict.” This can also be set to “relaxed” by changing the s to an r.aspf=s is the same as adkim=s, but for SPF.
For more information on configuring DMARC records, see here
It is also highly recommended to set up a DKIM DNS record. See here for more.
For example, my DNS configuration on Namecheap looks like this:
Configuring SSL
If you are going to use the MTA server over the internet, you will need to generate a certificate for it.
Administrators can easily generate a certificate using certbot; this uses the Let’s Encrypt CA:
sudo certbot certonly --manual --preferred-challenges dns -d mail.<domain-name> --email <admin-email> --agree-tos
Certbot will prompt you to enter a DNS TXT record in order to confirm that the domain belongs to you; follow the instructions and wait a few minutes before pressing Enter, as it will take a while for the DNS changes to propagate. Once the challenge has succeeded, certbot will indicate that a certificate and a key have been generated and are available at some location. For example, for me, it showed these details:
Successfully received certificate.
Certificate is saved at: /etc/letsencrypt/live/mail.markmizzi.dev/fullchain.pem
Key is saved at:         /etc/letsencrypt/live/mail.markmizzi.dev/privkey.pem
This certificate expires on 2024-12-18.
These files will be updated when the certificate renews.

NEXT STEPS:
- This certificate will not be renewed automatically. Autorenewal of --manual certificates requires the use of an authentication hook script (--manual-auth-hook) but one was not provided. To renew this certificate, repeat this same certbot command before the certificate's expiry date.

- - - - - - - - - - - - - - - - - - - - - - - - - - - - - - - - - - - - - - - -
If you like Certbot, please consider supporting our work by:
 * Donating to ISRG / Let's Encrypt:   https://letsencrypt.org/donate
 * Donating to EFF:                    https://eff.org/donate-le
- - - - - - - - - - - - - - - - - - - - - - - - - - - - - - - - - - - - - - - -
Note the certificate expiration date; certificates must be renewed using the certbot command shown above. Certbot will send an e-mail reminder to <admin-email> when the certificate has almost expired.
Tell postfix about the generated key and certificate by modifying these parameters in /etc/postfix/main.cf with the details returned by Certbot:
# TLS parameters
smtpd_tls_cert_file=<location-of-certificate>
smtpd_tls_key_file=<location-of-private-key>
Port forwarding on the router
Port forwarding rules are required to use an SMTP server over the Internet. We need to expose two ports; port 25 for receiving mail, and port 587 for sending it.
Port forwarding is usually managed via a table which can be edited through the router interface (this is usually available by accessing the largest local IP address on your local network, e.g. for me it is available at http://192.168.1.254).
Here are my port forwarding rules as an example of what a setup could look like:
Debugging
Logging for mail services (both MTA and MDA processes) is available at /var/log/mail.log. This file will also contain logging from milter programs registered with postfix.
3 - Setting up DKIM
Tutorial for setting up DKIM signing/verification on Postfix using OpenDKIM
Email headers contain a FROM: line that identifies the sender. This line is a part of the data sent, and is not used when the email is being routed to its destination. This means that an email can be successfully sent with an address in its FROM: line that does not match the actual sender; a flaw of SMTP used by malicious actors in order to send emails that appear to come from a legitimate source. This is called email spoofing.
Modern mail servers contain several protections against email spoofing, with one of the more advanced being DomainKeys Identified Mail (DKIM). MTA servers configured with DKIM sign outgoing emails. The signature is then verified against a public DNS TXT record that has a special format.
It is highly recommended to set up DKIM on any self hosted mail server, as otherwise a lot of mail services such as Gmail will automatically assume that mail sent from your mail server is spam.
We will configure DKIM for postfix using OpenDKIM, which is set up as a milter. I found this tutorial helpful when setting this up.
OpenDKIM can be installed using:
sudo apt-get update
sudo apt-get install -y opendkim opendkim-tools
Reloading configuration
OpenDKIM is configured via a config file at /etc/opendkim.conf. After changes to this file, you must restart the service:
sudo service opendkim restart
for the changes to take effect.
Basic Configuration
A basic configuration can be added using the following
echo '
# auto restart the DKIM filter on failures
AutoRestart             Yes
# specifies the filter’s maximum restart rate, if restarts begin to happen faster than this rate, the filter will terminate; 10/1h - 10 restarts/hour are allowed at most
AutoRestartRate         10/1h

# gives all access permissions to the user group defined by UserID and allows other users to read and execute files
UMask                   002
# the opendkim process runs under this user and group
UserID                  opendkim:opendkim

# these parameters enable detailed logging via calls to syslog
Syslog                  Yes
SyslogSuccess           Yes
LogWhy                  Yes

# defines the canonicalization methods used at message signing
# - the simple method allows almost no modification while
# - the relaxed one tolerates minor changes such as whitespace replacement;
# - relaxed/simple: the message header will be processed with the relaxed algorithm and the body with the simple one
Canonicalization        relaxed/simple

# specifies the external hosts that can send mail through the server as one of the signing domains without credentials
ExternalIgnoreList      refile:/etc/opendkim/TrustedHosts
# defines a list of internal hosts whose mail should not be verified but signed instead
InternalHosts           refile:/etc/opendkim/TrustedHosts
# maps key names to signing keys
KeyTable                refile:/etc/opendkim/KeyTable
# lists the signatures to apply to a message based on the address found in the From: header field
SigningTable            refile:/etc/opendkim/SigningTable

# declares operating modes; in this case the milter acts as a signer (s) and a verifier (v)
Mode                    sv

# the path to the Pid file which contains the process identification number
PidFile                 /var/run/opendkim/opendkim.pid

# selects the signing algorithm to use when creating signatures
SignatureAlgorithm      rsa-sha256

# the milter will listen on the socket specified here,
# Postfix will send messages to opendkim for signing and verification through this socket;
# 12301@localhost defines a TCP socket that listens on localhost, port 12301
Socket                  inet:12301@localhost' | sudo tee -a /etc/opendkim.conf
Make sure that port 12301 is free for OpenDKIM to use.
Open /etc/postfix/main.cf and add the following lines if they are not already present:
# The mail filter protocol version and optional protocol extensions for communication with a Milter application
# 6 specifies that we want to use Sendmail 8 mail filter protocol version 6
milter_protocol = 6
# The default action when a Milter (mail filter) response is unavailable (for example, bad Postfix configuration or Milter failure).
# accept specifies that we should proceed as if the mail filter was not present.
milter_default_action = accept

# A list of Milter (mail filter) applications for new mail that arrives via the Postfix smtpd server.
smtpd_milters = inet:localhost:12301
# A list of Milter (mail filter) applications for new mail that does not arrive via the Postfix smtpd server.
non_smtpd_milters = inet:localhost:12301
If smtpd_milters or non_smtpd_milters are already present and populated, add , inet:localhost:12301 to the end of both of them. For example, if using SpamAssassin as a milter, the current configuration will look like this:
smtpd_milters = unix:/spamass/spamass.sock
non_smtpd_milters = unix:/spamass/spamass.sock
and must be changed to this
smtpd_milters = unix:/spamass/spamass.sock, inet:localhost:12301
non_smtpd_milters = unix:/spamass/spamass.sock, inet:localhost:12301
Setting trusted hosts
Trusted hosts are hosts where mail originating from them does not require DKIM verification. They are defined in the /etc/opendkim/TrustedHosts file as per our configuration. We recommend limiting trusted hosts to local network hosts and public hosts with <domain-name>; this can be done using the following:
# create dir to store TrustedHosts file.
sudo mkdir -p /etc/opendkim
sudo chown opendkim:opendkim /etc/opendkim

# create and populate the TrustedHosts file
echo '
127.0.0.1
localhost
192.168.0.1/24

*.<domain-name>' | sudo tee /etc/opendkim/TrustedHosts

# change ownership of newly created hosts file to opendkim
sudo chown opendkim:opendkim /etc/opendkim/TrustedHosts
Creating the signing keys
The DKIM DNS record is a TXT record for <selector>._domainkey.<domain-name>, where <selector> is any alphanumeric string chosen during the setup of DKIM on the MTA.
Key tables map a selector/domain pair to a private key; they consist of lines in the following format:
<selector>._domainkey.<domain-name> <domain-name>:<selector>:<private-key-file>
In our case we will use mail as the <selector> and we will populate the key table (contained at /etc/opendkim/KeyTable as per our configuration) using:
echo 'mail._domainkey.<domain-name> <domain-name>:mail:/etc/opendkim/keys/<domain-name>/mail.private' | sudo tee /etc/opendkim/KeyTable

# change ownership of key table file to opendkim
sudo chown opendkim:opendkim /etc/opendkim/KeyTable
OpenDKIM also requires a signing table with lines in the following format:
*@<domain-name> <selector>._domainkey.<domain-name>
This will identify the key to use when signing emails outgoing from the MTA with domain name <domain-name>.
For our purposes we can populate the signing table (contained at /etc/opendkim/SigningTable as per our configuration) using:
echo '*@<domain-name> mail._domainkey.<domain-name>' | sudo tee /etc/opendkim/SigningTable

# change ownership of signing table file to opendkim
sudo chown opendkim:opendkim /etc/opendkim/SigningTable
We can finally generate a private key for OpenDKIM to use when signing outgoing emails, this can be done using the following commands:
sudo mkdir -p /etc/opendkim/keys/<domain-name>
cd /etc/opendkim/keys/<domain-name>

# create the signing private key for OpenDKIM
#   -s specifies the selector, in our case mail
#   -d specifies the domain name to be used with emails.
#   -b specifies the key size (in bytes), 2048 or greater does not work with Gmail in my experience.
sudo opendkim-genkey -s mail -d <domain-name> -b 1024

# change ownership of created key to opendkim
sudo chown -R opendkim:opendkim /etc/opendkim/keys/<domain-name>
Creating a DKIM DNS record
As mentioned above, the DKIM DNS record must contain the public key corresponding to the private key used by OpenDKIM to sign outgoing emails at the MTA. The public key and its information required for this DNS record can be accessed by running the following command:
sudo cat /etc/opendkim/keys/<domain-name>/mail.txt
To create the DKIM DNS record, create a TXT record for <selector>._domainkey.<domain-name> with content in the following format:
v=DKIM1; k=<public-key-type>; p=<public-key>;
The <selector> is chosen during OpenDKIM configuration (see above), and the values to put for k= and p= can be obtained from the DKIM configuration as well (see above).
In my case, for example, <selector> is mail, and the contents of the DKIM record are:
v=DKIM1; k=rsa; p=MIGfMA0GCSqGSIb3DQEBAQUAA4GNADCBiQKBgQDFMMPBxFVmYv+UqWG6YZUrpPq7P9NKovp6jw1m8rp/QQTFV5Ar8seCarbP7Rl7Q3UjIpO5JisKyfp9RjzkEZ8fnGpyZhOhzN9D4X5wf3ug37RbS4j8XF1zYx1m1POrtGHKiSa0BKBFSX15REs3RnkaiIRHNFmj+XIwTId5MyIOoQIDAQAB;
4 - Setting up a spam filter
Tutorial for setting up a spam filter on Postfix using SpamAssassin
I found this tutorial helpful while writing this article.
Installation
To install SpamAssassin, run the following commands:
sudo apt-get update
sudo apt-get install -y spamassassin spamc spamass-milter
Add a system user for SpamAssassin to use (this is not done automatically):
sudo useradd -m spamd
sudo usermod -L spamd
Enable and start SpamAssassin using:
sudo systemctl enable spamassassin
sudo service spamassassin start
sudo systemctl enable spamass-milter
sudo service spamass-milter start
You can check that SpamAssassin is running correctly using
sudo service spamassassin status
sudo service spamass-milter status
Reloading Configuration
Whenever you modify SpamAssassin’s configuration, make sure to restart it using
sudo service spamassassin reload
sudo service spamass-milter reload
for the changes to take effect.
Basic Configuration
SpamAssassin is configured using the file at /etc/default/spamassassin. Open this file and ensure that it contains the following values (you may have to edit or add values depending on whether they are already present):
# Options
# See man spamd for possible options. The -d option is automatically added.
#   '--create-prefs' specifies that user preferences files should be created.
#   '--max-children 5' specifies that a maximum of 5 children workers should be spawned.
#   '--username spamd' specifies that the user that spamd should run as is spamd
#   '--helper-home-dir /home/spamd/' specifies that the home dir used by spamd should be /home/spamd/
#   '-s /home/spamd/spamd.log' specifies the log file used by spamd.
OPTIONS="--create-prefs --max-children 5 --username spamd --helper-home-dir /home/spamd/ -s /home/spamd/spamd.log"

# Cronjob
# Set to anything but 0 to enable the cron job to automatically update
# spamassassin's rules on a nightly basis
CRON=1
Configuring postfix to work with SpamAssassin
Open /etc/postfix/main.cf and ensure that the following values are set:
# Milter configuration
milter_default_action = accept
milter_protocol = 6
smtpd_milters = local:spamass/spamass.sock
non_smtpd_milters = local:spamass/spamass.sock
If you are using the OpenDKIM extension, the values of smtpd_milters= and non_smtpd_milters= should already be set:
smtpd_milters = inet:localhost:12301
non_smtpd_milters = inet:localhost:12301
Change this to:
smtpd_milters = inet:localhost:12301,  local:spamass/spamass.sock
non_smtpd_milters = inet:localhost:12301, local:spamass/spamass.sock
Run
sudo service spamassassin reload
sudo service spamass-milter reload
for the changes to take effect.
Spam Rules
The filtering rules for SpamAssassin are highly configurable, and are specified by the user in the file /etc/spamassassin/local.cf.
We will set up the following configuration:
# By default, suspected spam messages will not have the Subject, From or To lines tagged to indicate spam.
# By setting this option, the header will be tagged with STRING to indicate that a message is spam.
# For the Subject header, this will be prepended to the original subject.
rewrite_header Subject [***** SPAM _SCORE_ *****]

# Set the score required before a mail is considered spam.
# n.nn can be an integer or a real number.
# 5.0 is the default setting, and is quite aggressive; it would be suitable for a single-user setup,
# but if you're an ISP installing SpamAssassin, you should probably set the default to be more conservative, like 8.0 or 10.0.
required_score          6.0

# Whether to use the naive-Bayesian-style classifier built into SpamAssassin.
use_bayes               1
# Whether SpamAssassin should automatically feed high-scoring mails (or low-scoring mails, for non-spam) into its learning systems.
bayes_auto_learn        1
Run
sudo service spamassassin reload
sudo service spamass-milter reload
to make sure the changes to take effect.
For a full list of configuration options see here
Verifying that SpamAssassin is working
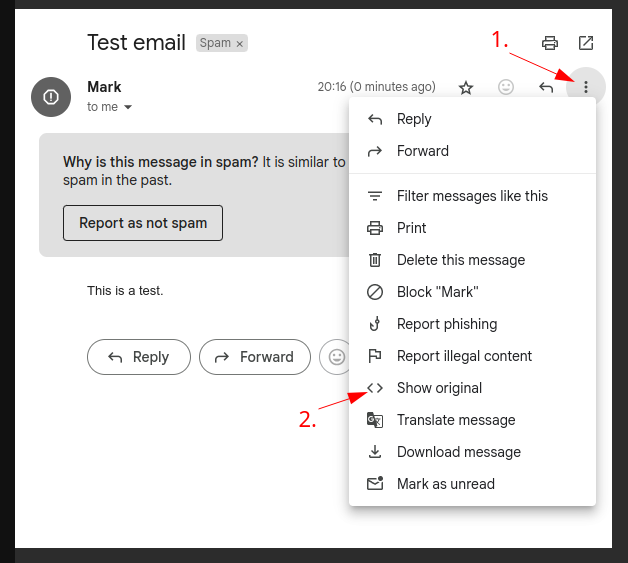
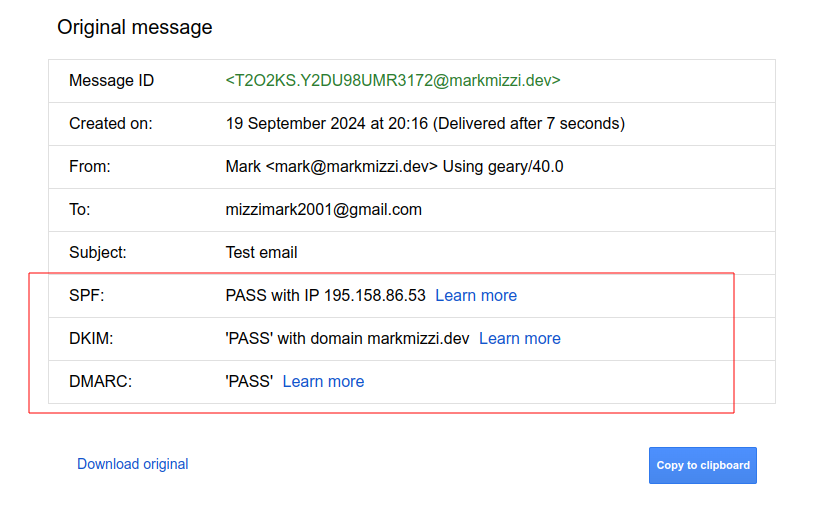
To check that SpamAssassin is working, send an email to one of the mailboxes configured on your mail server, and then open it in a UA program, such as Thunderbird. There should be an option to View Source of the email. Click it, which will show you the raw text actually sent over SMTP. If SpamAssassin is working you should find two lines that look like the following:
X-Spam-Status: No, score=-0.9 required=6.0 tests=DKIM_SIGNED,DKIM_VALID,
	DKIM_VALID_AU,DKIM_VALID_EF,FREEMAIL_ENVFROM_END_DIGIT,FREEMAIL_FROM,
	HTML_MESSAGE,RCVD_IN_DNSWL_NONE,RCVD_IN_MSPIKE_H2,SPF_HELO_NONE,
	SPF_PASS autolearn=unavailable autolearn_force=no version=3.4.6
X-Spam-Checker-Version: SpamAssassin 3.4.6 (2021-04-09) on mail.markmizzi.dev
The X-Spam-Status header also gives useful information about the spam score of an email, the threshold spam score set, and any tests used to determine the spaminess of the email.
Debugging
Logs for SpamAssassin are found /home/spamd/spamd.log, this is helpful to check when running into issues.
6 - Creating new users
Tutorial for creating new mail users
Creating new mail users is not straightforward with our setup, and while instructions are given in the rest of this tutorial, they are spread over multiple different pages. This page attempts to collect all the instructions for creating a new mail user in one place; for administration of your mail server long after you have set it up.
Creating a new system user
Each mail user must have a corresponding system user; this is created using the commands:
sudo useradd -m <username>
sudo usermod -L <username>
Users created with these commands will have a home directory to store their mailbox in Maildir format, but cannot login on the mail server. Preventing login ensures that users cannot access and edit their own mails on the server, thus corrupting dovecot state.
Creating a password
The new mail user needs a password to send mail and access their mailbox. This can be setup by running the following command:
printf "<mail-username>:`doveadm pw -s BLF-CRYPT -p '<password>'`\n" | sudo tee -a /usr/local/etc/passwd.replica
which uses the doveadm tool to convert a given password to a stored format according to the specified scheme (in this case Blowfish crypt or BLF-CRYPT), and then stores the <mail-username>:<password> pair in the specified passwd-file (in this case /usr/local/etc/passwd.replica).
Make sure that you select a strong password.
For more information on using doveadm pw see here.
Creating additional recipients
By default, a new mail user with username <mail-username> will receive mail at <mail-username>@<domain-name>. However, you may wish to add additional recipients for the user.
This can be done by adding lines to /etc/aliases in the form:
<recipient>: <mail-username>
For example if you want a newly created mail user suline to also receive male sent to wife@<domain-name> in their mailbox, you would add a line
Configuring sender addresses
A mail user must also be configured with email addresses that it is allowed to send mail from. This configuration is managed in the file /etc/postfix/sender_login.
There is one line for each email address and each mail user such that the mail user is allowed to send mail from that email address, in the following format:
<email-address> <mail-username>
It is usual to add at least the email address <mail-username>@<domain-name> to this file for new mail users. So for example for a new mail user suline, add
suline@<domain-name> suline
to allow suline to send mail from suline@<domain-name>.
postfix uses an indexed version of this file, which must be updated using
sudo postmap hash:/etc/postfix/sender_login
Reload postfix to ensure these changes take effect:
sudo service postfix reload