Setting up an MAA
This tutorial will use dovecot (2.3), a tried-and-tested MAA for Linux. A manual can be found here.
Installation
sudo apt-get update
# Install dovecot with IMAP and POP3 support, as well as the sieve plugin for filtering emails.
sudo apt-get install -y dovecot-imapd dovecot-pop3d dovecot-sieve
Make sure that dovecot is running well using the command:
sudo service dovecot status
Reloading configuration
dovecot is configured using a number of config files found under /etc/dovecot. When any of these are changed, dovecot must be reloaded using
sudo service dovecot reload
for the changes to take effect.
Configuring users
dovecot makes use of several users, as detailed here, but we are primarily interested in configuring mail users.
Mail users are accounts which have a mailbox on the mail server. Mail sent to <mailbox-name>@<domain-name> where <domain-name> is the domain name of your mail server will typically be routed to the mailbox of the user with username <mailbox-name>.
SMTP servers can also be set up with aliasing, so that multiple <mailbox-name>s map to a single mail user. So for example the server can be set up in such a way that any mail sent to either postmaster@markmizzi.dev or root@markmizzi.dev will end up in the mailbox of user root.
dovecot is quite flexible when it comes to configuring mail users but typically one of two options is used:
- System users where each mail user has their own system user in
/etc/passwd. - Virtual users where all mail users run under a single system user and are managed by
dovecotitself.
System users are generally recommended for security as the Linux installation will make sure that different users cannot access each other’s mailboxes (without any required configuration on the part of the sys admin). For this reason we will stick to system users in this tutorial.
dovecot is configured with user and password databases for user management. A user database is a method for storing, managing and retreiving mail users, while a password database is a method for storing passwords and authenticating users.
User database
For system users, the user database is always the /etc/passwd file. In order to make sure that dovecot is configured to use this user database, open /etc/dovecot/conf.d/auth-system.conf.ext and ensure that it contains the following lines:
# System users (NSS, /etc/passwd, or similar). In many systems nowadays this
# uses Name Service Switch, which is configured in /etc/nsswitch.conf.
userdb {
  # <doc/wiki/AuthDatabase.Passwd.txt>
  driver = passwd

  # Extra options go here...
}
Make sure as well that there are no other userdb {} clauses in the config file.
For more options on configuring how dovecot accesses the /etc/passwd file, see here.
By default user lookup is performed using special auth worker processes. If the /etc/passwd file is small and local this may add extra overhead that is unneeded. dovecot can be configured to perform the lookup in-process:
userdb {
  # <doc/wiki/AuthDatabase.Passwd.txt>
  driver = passwd
  # [blocking=no]
  args = blocking=no
}
New users can be created using the usual commands for Linux:
sudo useradd -m <username>
sudo usermod -L <username>
Users created with these commands will have a home directory to store their mailbox in Maildir format, but cannot login on the mail server. Preventing login ensures that users cannot access and edit their own mails on the server, thus corrupting dovecot state.
Note that existing users on the mail server will be treated as mail users as well. Extra care should be taken to ensure that such users do not access and corrupt their mailbox directly through an ssh session. Such users should also have a password configured for their mail which is different from their login password on the mail server, as IMAP and POP3 clients often share unencrypted passwords over the internet. See here for more details.
For more details on user databases in general see here.
Password database
If configured with system users, dovecot can be set up to use the same password for the mail as the system password for the system user corresponding to a particular mail user. If this is required, then there are three different password databases to choose from:
- PAM: Most commonly used in Linux and BSDs nowadays.
- BSDAuth: BSD authentication is used by OpenBSD.
- Passwd: System users (NSS, /etc/passwd, or similar). This may work instead of PAM (mostly in some BSDs).
However, we do not recommend this approach, as mail passwords can be shared unencrypted over the internet by IMAP and POP3 clients, often without warning. We therefore recommend configuring dovecot to use non-system passwords as mail passwords, and encouraging mail users to use different mail and system passwords.
In our case, we will use passwd-file as our password database. This is a file which replicates /etc/passwd, but contains actual passwords, unlike /etc/passwd in most modern UNIX-like systems. Since we are using the file to simply look up passwords, we can also omit most fields normally found in /etc/passwd, so that the passwd-file we use consists of lines with the following format
<mail-username>:<password>
<password> is not the plaintext password but is a special storage format for passwords. The format used can be specified by a password scheme; dovecot supports multiple.
In order to specify that we want to use the passwd-file password database, as well as to specify where the file will be stored and what password scheme will be used, make sure that /etc/dovecot/conf.d/auth-system.conf.ext contains the following clause:
passdb {
  # specify passwd-file as our password database
  driver = passwd-file

  # Arguments specific to the password database we are using.
  # In our case we are specifying that the password scheme we want to use is Blowfish crypt (blf-crypt),
  # and that the passwd-file is stored at /usr/local/etc/passwd.replica
  args = scheme=blf-crypt /usr/local/etc/passwd.replica
  default_fields =
  override_fields =

  # If yes, used to provide denied users database
  # (In our case a denied user would be a system user who is not allowed to have a mailbox).
  # If the user is found from the passdb, the authentication will fail.
  deny = no

  # If yes, used to provide Master users/passwords.
  # The users listed in the master passdb can log in as other users.
  master = no
  pass = no

  # Do we sometimes want to skip over this passdb?
  # This is only useful when there are multiple passdbs
  skip = never
  mechanisms =
  username_filter =

  # What to do if authentication failed
  result_failure = continue
  # What to do if the passdb lookup had an internal failure
  result_internalfail = continue
  # What to do if the authentication succeeded
  result_success = return-ok

  # v2.2.24+
  auth_verbose = default
}
and that there are no other passdb {} clauses. For more details on general configuration of the passdb {} clause, see here. For more details on specific arguments which can be passed to args= when driver=passwd-file, see here.
Note also that multiple passwd-files can be specified as indicated here; this can be especially useful if the MAA server is being used to service multiple domain names, as it would allow mail users to have seperate passwords depending on the domain.
For more details on password databases in general see here.
Generating and storing passwords in a passwd-file
System administrators need to populate a passwd-file manually with passwords for all mail users. This can be done using the following command:
printf "<mail-username>:`doveadm pw -s BLF-CRYPT -p '<password>'`\n" | sudo tee -a /usr/local/etc/passwd.replica
which uses the doveadm tool to convert a password to a stored format according to the specified scheme (in this case Blowfish crypt or BLF-CRYPT), and then stores the <mail-username>:<password> pair in the specified passwd-file (in this case /usr/local/etc/passwd.replica).
For more information on using doveadm pw see here.
Specifying multiple password databases
It’s worth noting that dovecot is flexible enough to use multiple password databases. This works by specifying multiple passdb {} clauses. dovecot will then try every password database in the order in which they are declared in /etc/dovecot/conf.d/auth-system.conf.ext. The result_failure=, result_internalfail= and result_success= parameters in a passdb {} clause dictate how/whether authentication is delegated to the next password database in the case of an authentication failure, an internal failure, and an authentication success respectively.
They can be set to the following values:
return-ok: Return success, don’t continue to the next passdb.return-fail: Return failure, don’t continue to the next passdb.return: Return earlier passdb’s success or failure, don’t continue to the next passdb. If this was the first passdb, return failure.continue-ok: Set the current authentication state to success, and continue to the next passdb. The following passdbs will skip password verification.continue-fail: Set the current authentication state to failure, and continue to the next passdb. The following passdbs will still verify the password.continue: Continue to the next passdb without changing the authentication state. The initial state is failure. If this was set in result_success, the following passdbs will skip password verification.
There are also two special cases to mention when using multiple password databases. If the deny= option in a passdb {} clause is set to yes, that password database will be used as the denied users database. In our case, these are system users which we do not want to be mail users. Authentication of such users against the denied users database will always fail. Denied users databases should be placed at the top of /etc/dovecot/conf.d/auth-system.conf.ext, before any other password databases, and they should always be used in conjunction with other password databases so that system users intended to also be mail users can also be authenticated.
Another special case occurs when the master= option in a passdb {} clause is set to yes. In this case the password database will be used for master users, i.e. special users who can login as any other mail user in the system.
Mailbox format
The mailbox format used determines how emails are stored on disk. dovecot supports the following mailbox formats:
| Name | Tag | Description |
|---|---|---|
| obox | obox | OX Dovecot Pro object storage mailbox format. (Pro only) |
| mbox | mbox | Traditional UNIX mailbox format. Users’ INBOX mailboxes are commonly stored in /var/spool/mail or /var/mail directory. Single file contains multiple messages. |
| Maildir | maildir | One file contains one message. A reliable choice since files are never modified and all operations are atomic. The top-level Maildir directory contains the Maildir/cur, Maildir/new, and Maildir/tmp subdirectories. |
| dbox | sdbox | single-dbox, one message per file. Dovecot’s own high performance mailbox format. Messages are stored in one or more files, each containing one or more messages. |
| dbox | mdbox | multi-dbox, multiple messages per file. Dovecot’s own high performance mailbox format. Messages are stored in one or more files, each containing one or more messages. |
| imapc | imapc | Use remote IMAP server as mail storage. |
| pop3c | pop3c | Use remote POP3 server as mail storage. |
For this tutorial we will use the Maildir format. For a technical overview of this format and the way in which dovecot implements it, see here.
Mailbox formats and related configuration is stored in /etc/dovecot/conf.d/10-mail.conf; this file should also contains lots of information about the available settings in comments by default.
For the purposes of this tutorial it is sufficient to set mail_location= to the following
mail_location = maildir:~/Maildir:LAYOUT=fs
in this configuration file. With this set, a mail user’s mailboxes (and hence all their emails) will be stored under ~/Maildir where ~ is the corresponding system user’s home directory. The LAYOUT=fs part of the setting ensures that hierarchal directories are used for mailboxes, as specified here.
For more configuration related to Maildir, see here.
For more details on how dovecot supports mailboxes, see here
Client protocols and Encryption
MAA clients (embedded into user agent programs such as Thunderbird) fetch mail from MAA servers using one of two popular protocols: IMAP and POP3.
When IMAP is used, the MAA client stores only the subject line and sender name locally. The email body is stored indefinitely on the mail server (in the mailbox), and is requested on demand from the MAA server when the end user opens the email.
POP3 is an alternative, less flexible protocol where the entire email is downloaded onto and stored by the MAA client from the MAA server, and then deleted on the mail server’s mailbox. This means that a particular email can typically only be downloaded from a single client, and mail cannot be synced across multiple clients belonging to the same mail user. It carries the advantage that the mail server does not need to store emails indefinitely, however, and hence might be useful if the mail server manages a large number of users who each use only a single client. It might also be more secure than IMAP in certain situations, as it is harder for an attacker to access emails if the mail server is compromised.
For more details about IMAP and POP3 see here.
See also our reference material on email.
Configuring IMAP
Configuration related to the IMAP protocol is stored in /etc/dovecot/conf.d/20-imap.conf. By default this file also contains lots of information in comments about the available settings. For our purposes, this configuration file can be left as is.
Configuring POP3
Configuration related to the POP3 protocol is stored in /etc/dovecot/conf.d/20-pop3.conf. By default this file also contains lots of information in comments about the available settings. For our purposes, this configuration file can be left as is.
Configuring DNS
If you wish to use the MAA server over the Internet, it is recommended to give it a DNS name. Conventionally this is imap.<domain-name> where <domain-name> is the DNS name you want to use in email addresses. You can create an A record in your DNS management software which connects this DNS name to the MAA server’s public IP address. For example my configuration for this on Namecheap is:
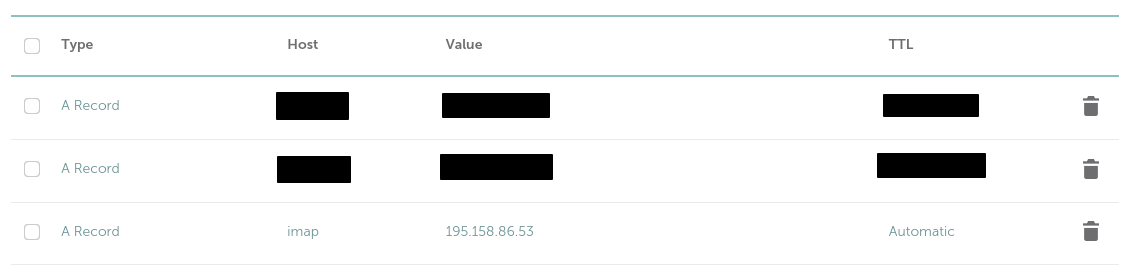
Note that to use an MAA server over the internet, you also need to configure an appropriate SSL certificate and port forwarding rules (see below).
Configuring SSL
SSL needs to be configured in order to use encrypted versions of IMAP and POP3; this is highly recommended when using your MAA server over the Internet.
SSL configuration for dovecot is stored in the config file /etc/dovecot/conf.d/10-ssl.conf.
The main settings of interest are the following:
# SSL/TLS support: yes, no, required. <doc/wiki/SSL.txt>
ssl = yes

# PEM encoded X.509 SSL/TLS certificate and private key. They're opened before
# dropping root privileges, so keep the key file unreadable by anyone but
# root. Included doc/mkcert.sh can be used to easily generate self-signed
# certificate, just make sure to update the domains in dovecot-openssl.cnf
ssl_cert = </etc/dovecot/private/dovecot.pem
ssl_key = </etc/dovecot/private/dovecot.key
By default SSL is enabled. The ssl_key= option specifies the private key to be used in SSL decryption, while the ssl_cert= option is a (by default self-signed) certificate associating the corresponding public key with the MDA server’s local hostname.
When using the MAA server over the internet, the default certificate must be replaced by one signed by a well known, trusted CA that also contains the server’s DNS name. A certificate can easily be obtained using certbot; this uses the Let’s Encrypt CA:
sudo certbot certonly --manual --preferred-challenges dns -d imap.<domain-name> --email <admin-email> --agree-tos
Certbot will prompt you to create a DNS TXT record in order to confirm that the domain belongs to you; follow the instructions and wait a few minutes before pressing Enter, as it will take some time for the DNS changes to propagate. Once the challenge has succeeded, certbot will indicate that a certificate and a key have been generated and are available at some location. For example, in my case it showed these details:
Successfully received certificate.
Certificate is saved at: /etc/letsencrypt/live/imap.markmizzi.dev/fullchain.pem
Key is saved at:         /etc/letsencrypt/live/imap.markmizzi.dev/privkey.pem
This certificate expires on 2024-12-18.
These files will be updated when the certificate renews.

NEXT STEPS:
- This certificate will not be renewed automatically. Autorenewal of --manual certificates requires the use of an authentication hook script (--manual-auth-hook) but one was not provided. To renew this certificate, repeat this same certbot command before the certificate's expiry date.

- - - - - - - - - - - - - - - - - - - - - - - - - - - - - - - - - - - - - - - -
If you like Certbot, please consider supporting our work by:
 * Donating to ISRG / Let's Encrypt:   https://letsencrypt.org/donate
 * Donating to EFF:                    https://eff.org/donate-le
- - - - - - - - - - - - - - - - - - - - - - - - - - - - - - - - - - - - - - - -
Note the certificate expiration date; certificates must be renewed using the certbot command shown above when they expire. Certbot will send an email reminder to <admin-email> when the certificate has almost expired.
Note also the locations of the certificate and the key (in my case /etc/letsencrypt/live/imap.markmizzi.dev/fullchain.pem and /etc/letsencrypt/live/imap.markmizzi.dev/privkey.pem respectively). Create symbolic links from these locations to /etc/dovecot/private/dovecot.pem and /etc/dovecot/private/dovecot.key, e.g. I would run
sudo ln -f -s /etc/letsencrypt/live/imap.markmizzi.dev/fullchain.pem /etc/dovecot/private/dovecot.pem
sudo ln -f -s /etc/letsencrypt/live/imap.markmizzi.dev/privkey.pem /etc/dovecot/private/dovecot.key
Note that these symbolic links do not need to be re-created when renewing certificates if Certbot places the newly created certificate and key in the same locations.
It is also possible to configure SSL in several other ways, such as having different certificates and keys depending on the protocol (IMAP or POP3), IP address, or DNS name of the MAA server. In addition, it is also possible to require certificates from email clients for additional security. A full guide to SSL configuration of dovecot can be found here.
Port forwarding on the router
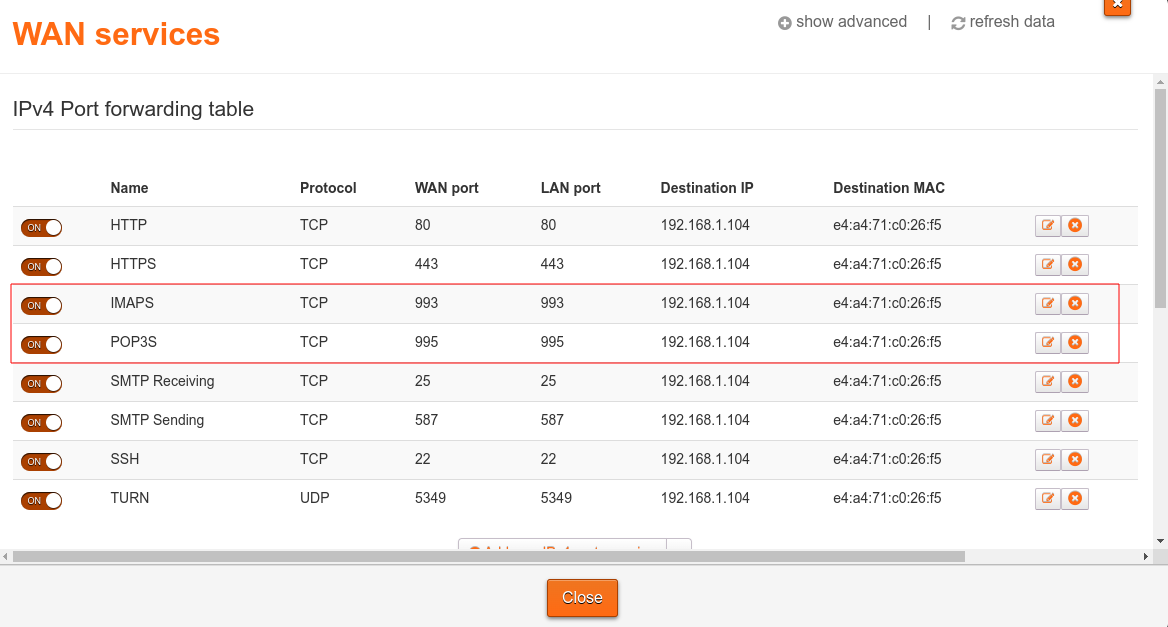
If the MAA server needs to be used over the internet, ports used by the IMAP and POP3 protocol need to be made public using port forwarding at the router.
IMAP and POP3 use ports 143 and 110 respectively. However, these are unencrypted versions of the protocol which send data in plaintext form, and so it is not recommended to use them over the Internet. Instead the encrypted versions of these protocols, IMAPS and POP3S should be used. These use ports 993 and 995 respectively.
Port forwarding is managed via a table which can be edited through the router interface (this is usually available by accessing the largest local IP address on your local network, e.g. for me it is available at http://192.168.1.254).
Here are my port forwarding rules as an example of what a setup could look like:
Debugging
Logging for mail services (both MTA and MDA processes) is available at /var/log/mail.log. Use
cat /var/log/mail.log | grep dovecot
to filter for dovecot logging.