Setting up an MTA
An MTA server is responsible for actually sending and receiving emails. It does this via the Simple Mail Transfer Protocol (SMTP). User agent programs (such as Thunderbird) send mail by communicating with an MTA server via SMTP. Incoming email is received by the MTA server from other MTAs using SMTP, and then stored in the appropriate user mailbox where the MAA server can access it and make it available to MAA clients.
For more information on the SMTP protocol, see here or see our reference material on email.
As an MTA, we will use postfix.
Milters (portmanteau for mail filters) are special programs which are used to filter received or sent emails. They can be used with the postfix and sendmail MTAs, and communicate with them over TCP. The MTA server informs and provides data about each stage of the email receipt/sending to milters, and milter programs can choose to terminate sending/receiving the email at any point.
It is recommended to configure postfix with some milter programs (see Setting up DKIM and Spam filters).
Installation
sudo apt-get update
sudo apt-get install -y postfix
When prompted with this screen:
  ┌───────────────────────────┤ Postfix Configuration ├───────────────────────────┐
  │ Please select the mail server configuration type that best meets your needs.  │
  │                                                                               │
  │  No configuration:                                                            │
  │   Should be chosen to leave the current configuration unchanged.              │
  │  Internet site:                                                               │
  │   Mail is sent and received directly using SMTP.                              │
  │  Internet with smarthost:                                                     │
  │   Mail is received directly using SMTP or by running a utility such           │
  │   as fetchmail. Outgoing mail is sent using a smarthost.                      │
  │  Satellite system:                                                            │
  │   All mail is sent to another machine, called a 'smarthost', for              │
  │   delivery.                                                                   │
  │  Local only:                                                                  │
  │   The only delivered mail is the mail for local users. There is no            │
  │   network.                                                                    │
  │                                                                               │
  │ General mail configuration type:                                              │
  │                                                                               │
  │                           No configuration                                    │
  │                           Internet Site                                       │
  │                           Internet with smarthost                             │
  │                           Satellite system                                    │
  │                           Local only                                          │
  │                                                                               │
  │                                                                               │
  │                     <Ok>                         <Cancel>                     │
  │                                                                               │
  └───────────────────────────────────────────────────────────────────────────────┘
choose Internet Site as the configuration that should be installed.
Then enter the domain name you want to use in your email addresses in the following screen:
 ┌────────────────────────────┤ Postfix Configuration ├────────────────────────────┐
 │ The 'mail name' is the domain name used to 'qualify' _ALL_ mail addresses       │
 │ without a domain name. This includes mail to and from <root>: please do not     │
 │ make your machine send out mail from root@example.org unless root@example.org   │
 │ has told you to.                                                                │
 │                                                                                 │
 │ This name will also be used by other programs. It should be the single, fully   │
 │ qualified domain name (FQDN).                                                   │
 │                                                                                 │
 │ Thus, if a mail address on the local host is foo@example.org, the correct       │
 │ value for this option would be example.org.                                     │
 │                                                                                 │
 │ System mail name:                                                               │
 │                                                                                 │
 │ _______________________________________________________________________________ │
 │                                                                                 │
 │                      <Ok>                          <Cancel>                     │
 │                                                                                 │
 └─────────────────────────────────────────────────────────────────────────────────┘
To check that it is running correctly, use:
sudo service postfix status
Reloading configuration
postfix is configured mainly through a single config file at /etc/postfix/main.cf. After configuration changes, postfix needs to be reloaded with:
sudo service postfix reload
in order for the changes to take effect.
Basic Configuration
Ensure that /etc/postfix/main.cf contains the following:
# public DNS name of this MTA server
myhostname = mail.<domain-name>

# The list of domains that are delivered via the $local_transport mail delivery transport.
# In other words this is the list of domains for which postfix will send/receive mail
mydestination = mail.<domain-name>, <domain-name>, localhost, localhost.localdomain

# The next-hop destination(s) for non-local mail
# In this case we do not want to use postfix as a relay, so we leave it empty
relayhost =

# The list of "trusted" remote SMTP clients that have more privileges than "strangers".
# In particular, "trusted" SMTP clients are allowed to relay mail through Postfix.
# We limit these to local clients only.
# NOTE that I don't think this value matters for our setup.
mynetworks = 127.0.0.0/8 [::ffff:127.0.0.0]/104 [::1]/128

# The maximal size of any local individual mailbox or maildir file, or zero (no limit).
mailbox_size_limit = 0

# The set of characters that can separate an email address localpart, user name, or a
# .forward file name from its extension.
#
# For example, with "recipient_delimiter = +", the software tries user+foo@example.com
# before trying user@example.com, user+foo before trying user, and .forward+foo before
# trying .forward.
recipient_delimiter = +

# The local network interface addresses that this mail system receives mail on.
# Specify "all" to receive mail on all network interfaces (default)
inet_interfaces = all

# specify that received mail should be stored using Maildir format, this matches our dovecot installation.
# Each mail user will have a mailbox at ~/Maildir.
home_mailbox = Maildir/
Receiving mail
We need to specify recipients (the part before @ in an email address) to postfix so that it knows how to route incoming mail to the right mail user’s mailbox. Up until now we have treated mail users and recipients as interchangeable, but postfix allows for multiple recipients to map to the same mail user. This means that emails sent to postmaster@markmizzi.dev and root@markmizzi.dev, for e.g. may both be routed into the root user’s mailbox.
To specify recipients, we use the following configuration parameter:
local_recipient_maps = proxy:unix:passwd.byname $alias_maps
proxy:unix:passwd.bynameensures that each system user in/etc/passwdis also a recipient; this is important as ourdovecotsetup assumes that each system user is also a mail user. This option hence ensures that mail can be sent to each mail user defined indovecot’s user database, using their username as the recipient.$alias_mapsare optional lookup tables that are searched in order to determine the mail user corresponding to a particular recipient.
Because of the order in which we specified the options, the /etc/passwd file will be searched first.
One file in $alias_maps by default is /etc/aliases, which we can modify to map recipients to mail users. These are some common mappings added:
mailer-daemon: postmaster
postmaster: root
nobody: root
hostmaster: root
usenet: root
news: root
webmaster: root
www: root
ftp: root
abuse: root
With this setup emails sent to postmaster@<domain-name>, www@<domain-name>, abuse@<domain-name>, and so on will all be routed to root’s mailbox.
Architecturally, Postfix consists of several daemon processes which can be configured under /etc/postfix/master.cf. One of the processes which can (and should) be configured is an SMTP server for receiving mail; this listens on port 25 by default.
Open /etc/postfix/master.cf and underneath
# ==========================================================================
# service type  private unpriv  chroot  wakeup  maxproc command + args
#               (yes)   (yes)   (no)    (never) (100)
# ==========================================================================
add the following:
smtp      inet  n       -       y       -       -       smtpd
  -o syslog_name=postfix/smtp
  -o smtpd_tls_security_level=encrypt
The postfix installation will probably have a similar process defined already in /etc/postfix/master.cf make sure to delete any duplicates.
The process defined above will listen for incoming mail at port 25, in addition we also override some options in /etc/postfix/main.cf using the -o flag:
syslog_namesets the name used when logging to/var/log/mail.log; we set this to something unique so we can easily filter logs if needed.smtpd_tls_security_level: Setting this toencryptmeans that our server will only accept incoming mail if this is sent over an encrypted (TLS) channel.
Sending mail
We must define an additional process in /etc/postfix/master.cf for submitting mail to be sent; this listens at port 587 by default. In addition, we want to restrict who can send mail from our server to users which have mail users configured in dovecot’s user database.
We can do this by defining the following process in /etc/postfix/master.cf:
submission inet n - n - - smtpd
  -o syslog_name=postfix/submission
  -o smtpd_tls_security_level=encrypt
  -o smtpd_sasl_auth_enable=yes
  -o smtpd_sasl_type=dovecot
  -o smtpd_sasl_path=private/auth
  -o smtpd_sasl_security_options=noanonymous
  -o smtpd_client_restrictions=permit_sasl_authenticated,reject
  -o smtpd_sender_restrictions=reject_authenticated_sender_login_mismatch
  -o smtpd_sender_login_maps=hash:/etc/postfix/sender_login
  -o smtpd_recipient_restrictions=reject_non_fqdn_recipient,reject_unknown_recipient_domain,permit_sasl_authenticated,reject
The new options used and their meanings are:
smtpd_sasl_auth_enableenables SASL; this is a generic autentication framework used to authenticate users sending mail with SMTP.smtpd_sasl_typespecifies the SASL plug in that thepostfixSMTP server should use for authentication. In our case we will usedovecot’s user database to provide authentication, and hence we specifydovecotas the plugin.smtpd_sasl_pathcontains some implementation-specific information that thepostfixSMTP server passes to the SASL plugin; in our case it is a path to a local file that will also be specified in thedovecotconfiguration (see below). The SMTP server and the SASL provider (in our casedovecot) can use this file to communicate any configuration information.smtpd_sasl_security_optionsdetermines SASL security options. In our case we setnoanonymousto disable unauthenticated clients that can send mail as “guests”.smtpd_client_restrictionsspecify a list of optional restructions that the SMTP server applies in the context of a client connection request. In our case we setpermit_sasl_authenticated,rejectwhich allows SASL authenticated clients and rejects all other client connections.smtpd_sender_restrictionsspecifies optional restrictions that the Postfix SMTP server applies in the context of a clientMAIL FROMcommand. In our case we enablereject_authenticated_sender_login_mismatchwhich ensures that the email address given in theMAIL FROMcommand is owned by the mail user sending the email.smtpd_sender_login_mapsis a set of optional lookup tables with the SASL login names that ownMAIL FROMaddresses. We specifyhash:/etc/postfix/sender_login, meaning that the file/etc/postfix/sender_loginis used as a lookup table. You must create this file and put inside it one line for each email address and each mail user such that the mail user can send emails withMAIL FROMset to that email address in the following format:<email-address> <mail-username>For example my
/etc/postfix/sender_loginfile contains the following:mark@markmizzi.dev mark root@markmizzi.dev root postmaster@markmizzi.dev root noreply@markmizzi.dev noreplypostfixuses an indexed version of this file, which must be created usingsudo postmap hash:/etc/postfix/sender_loginRe-run this command every time you change
/etc/postfix/sender_login.smtpd_recipient_restrictionsspecies optional restrictions that the Postfix SMTP server applies in the context of a clientRCPT TOcommand. In our case we don’t allow clients to send mail to email addresses that (1) do not have a fully qualified domain name (reject_non_fqdn_recipient), (2) that have a domain with an unknown mail server, i.e. no valid MX or A DNS records for a mail server (reject_unknown_recipient_domain), and (3) we allow the request when the client is SASL authenticated (permit_sasl_authenticated).
dovecot needs to be configured with an authentication service for postfix to be able to use it to authenticate clients that want to send mail with SASL; this can be done by adding
  unix_listener /var/spool/postfix/private/auth {
    group = postfix
    mode = 0660
    user = postfix
  }
within the service auth {} block in /etc/dovecot/conf.d/10-master.conf. Note that this only works when postfix and dovecot are running on the same machine. See here for details on making this work if this is not the case for you.
Make sure that /etc/dovecot/conf.d/10-auth.conf contains the following lines:
# Outlook and Windows Mail works only with LOGIN mechanism, not the standard PLAIN:
auth_mechanisms = plain login
Extra Information
As mentioned above, postfix can be configured with many more daemon processes in /etc/postfix/master.cf. For an overview of the postfix architecture and how it uses these various daemon processes, see here
For more about configuring /etc/postfix/master.cf, see here, or run man 5 master on the system with your postfix installation.
Configuring DNS
I found this article helpful while writing this section.
The MTA server requires certain DNS records in order to operate correctly over the Internet. These are:
An A record linking the MTA server’s public IP address to a DNS name, conventionally
mail.<domain-name>where<domain-name>is the domain you wish to use in your e-mail addresses.An MX record linking
<domain-name>to the MTA server’s DNS name defined in the previous record, e.g.mail.<domain-name>. MX records define MTA servers associated with a particular<domain-name>. A particular<domain-name>can have more than one MX record linking to multiple MTA servers; this can be used to implement failovers.A Sender Policy Framework (SPF) record to define which IP addresses are allowed to send mail from
<domain-name>. This is needed in order to prevent e-mail spoofing, as by default any IP address can send mail for<domain-name>. Detailed information on how to configure SPF records can be found here. A simple configuration that works is to define a TXT record for<domain-name>with the valuev=spf1 mx -all; this allows mail servers linked to<domain-name>by MX records to send mail on behalf of<domain-name>, and prohibits all other IP addresses.A Domain-based Message Authentication, Reporting and Conformance (DMARC) record determines what happens to an email after it is checked against SPF and DKIM records. The DMARC policy determines if a check failure results in the email being marked as spam, getting blocked, or being delivered to its intended recipient. DMARC records are TXT records for
_dmarc.<domain-name>with the content defining the intended behaviour. In our case, we will set the content tov=DMARC1; p=quarantine; adkim=s; aspf=s;where each of these fields means the following:
v=DMARC1indicates that this TXT record contains a DMARC policy and should be interpreted as such by email servers.p=quarantineindicates that email servers should “quarantine” emails that fail DKIM and SPF: considering them to be potentially spam. Other possible settings for this includep=none, which allows emails that fail to still go through, andp=reject, which instructs email servers to block emails that fail.adkim=smeans that DKIM checks are “strict.” This can also be set to “relaxed” by changing thesto anr.aspf=sis the same asadkim=s, but for SPF. For more information on configuring DMARC records, see here
It is also highly recommended to set up a DKIM DNS record. See here for more.
For example, my DNS configuration on Namecheap looks like this:
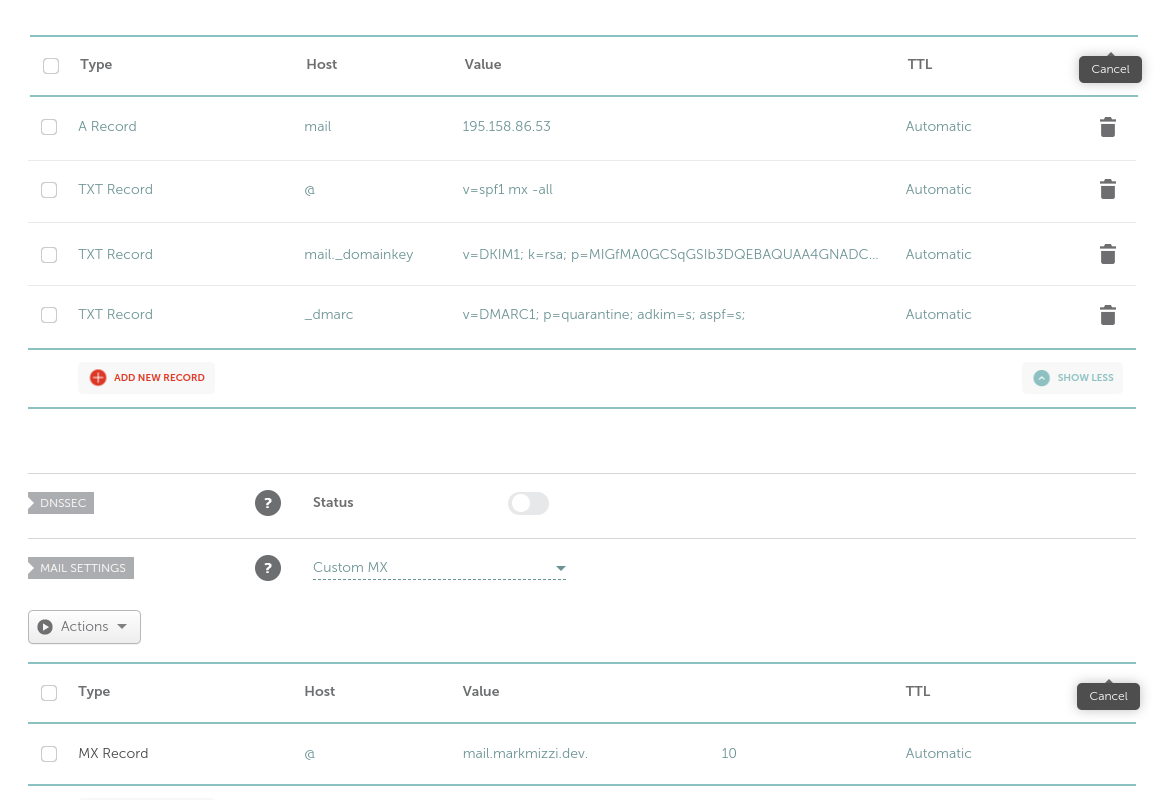
Configuring SSL
If you are going to use the MTA server over the internet, you will need to generate a certificate for it.
Administrators can easily generate a certificate using certbot; this uses the Let’s Encrypt CA:
sudo certbot certonly --manual --preferred-challenges dns -d mail.<domain-name> --email <admin-email> --agree-tos
Certbot will prompt you to enter a DNS TXT record in order to confirm that the domain belongs to you; follow the instructions and wait a few minutes before pressing Enter, as it will take a while for the DNS changes to propagate. Once the challenge has succeeded, certbot will indicate that a certificate and a key have been generated and are available at some location. For example, for me, it showed these details:
Successfully received certificate.
Certificate is saved at: /etc/letsencrypt/live/mail.markmizzi.dev/fullchain.pem
Key is saved at:         /etc/letsencrypt/live/mail.markmizzi.dev/privkey.pem
This certificate expires on 2024-12-18.
These files will be updated when the certificate renews.

NEXT STEPS:
- This certificate will not be renewed automatically. Autorenewal of --manual certificates requires the use of an authentication hook script (--manual-auth-hook) but one was not provided. To renew this certificate, repeat this same certbot command before the certificate's expiry date.

- - - - - - - - - - - - - - - - - - - - - - - - - - - - - - - - - - - - - - - -
If you like Certbot, please consider supporting our work by:
 * Donating to ISRG / Let's Encrypt:   https://letsencrypt.org/donate
 * Donating to EFF:                    https://eff.org/donate-le
- - - - - - - - - - - - - - - - - - - - - - - - - - - - - - - - - - - - - - - -
Note the certificate expiration date; certificates must be renewed using the certbot command shown above. Certbot will send an e-mail reminder to <admin-email> when the certificate has almost expired.
Tell postfix about the generated key and certificate by modifying these parameters in /etc/postfix/main.cf with the details returned by Certbot:
# TLS parameters
smtpd_tls_cert_file=<location-of-certificate>
smtpd_tls_key_file=<location-of-private-key>
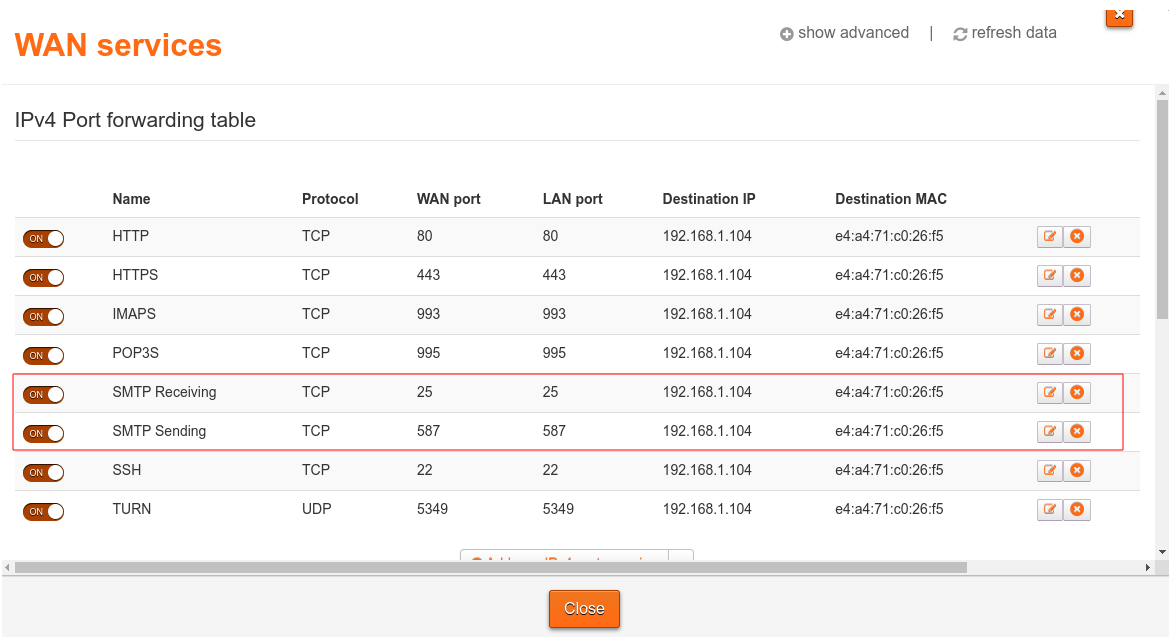
Port forwarding on the router
Port forwarding rules are required to use an SMTP server over the Internet. We need to expose two ports; port 25 for receiving mail, and port 587 for sending it.
Port forwarding is usually managed via a table which can be edited through the router interface (this is usually available by accessing the largest local IP address on your local network, e.g. for me it is available at http://192.168.1.254).
Here are my port forwarding rules as an example of what a setup could look like:
Debugging
Logging for mail services (both MTA and MDA processes) is available at /var/log/mail.log. This file will also contain logging from milter programs registered with postfix.