TURN server
TURN servers can act as a public relay between two clients that are both behind a NAT or a firewall but want to communicate directly via UDP. They are used in several contexts, most notably the WebRTC protocol, which uses TURN or STUN for peer to peer (p2p) communication.
This tutorial shows you how to host your own TURN server on Ubuntu 22.04 using coturn .
I found this tutorial helpful while writing this article.
Installation
coturn can be installed on Ubuntu 22.04 using the following commands:
sudo apt-get update
sudo apt-get install -y coturn
Running coturn as a system service
By default coturn does not run as a system (systemd) service. To change this open the configuration file /etc/default/coturn and uncomment the following line:
TURNSERVER_ENABLED=1
Next run the two following commands to start and enable coturn as a systemd service:
sudo service coturn start
sudo systemctl enable coturn
Check that the coturn service is running correctly by running:
sudo service coturn status
Basic configuration
coturn is configured through a configuration file at /etc/turnserver.conf. Make sure to restart coturn after configuration changes:
sudo service coturn restart
for those changes to take effect.
Make a backup copy of the configuration file before changing it:
sudo cp /etc/turnserver.conf /etc/turnserver.conf.backup
This will ensure we can revert breaking changes.
Open the configuration file and make sure the following options are set appropriately (you may want to search within the file as it should already contain default/commented values for all these fields):
# realm for the TURN server
realm=<domain> # e.g. markmizzi.dev
# DNS name for the TURN server
# This should be a host within the realm set.
server-name=<server-dns-name> # e.g. turn.markmizzi.dev

# IPs the TURN server accepts incoming connections from
# 0.0.0.0 means all IP addresses can connect to the TURN server.
listening-ip=0.0.0.0

# External IP Address of the TURN server
external-ip=<ip>
# Listening port; TURN clients will connect to this port (unless using SSL)
listening-port=3478

# Lower and upper bounds of the UDP relay endpoints:
# (default values are 49152 and 65535)
min-port=10000
max-port=20000

# Use fingerprint in TURN message
fingerprint

# Path to log file for coturn
log-file=/var/log/turnserver.log

# Run TURN server in normal verbose mode
verbose
Configuring DNS
You are probably going to use the TURN server over the internet (otherwise it cannot act as a public relay). It is therefore useful to set a DNS name for it. This DNS name should match the setting server-name.
For example in my case I set server-name to turn.markmizzi.dev and so I created the following A record:

The public IP address in the A record should match the external-ip setting.
Configuring SSL
By default a TURN server does not encrypt communication, however it can be configured to do so with SSL. It is strongly suggested to enable SSL, as otherwise credentials for the TURN server will be sent in plaintext form over the Internet.
To configure SSL, you first need to create an asymmetric key pair and a certificate. This can be done using certbot (which uses Let’s Encrypt as a CA):
sudo certbot certonly --manual \
    --preferred-challenges dns \
    --email <email> \
    --agree-tos \
    -d <server-name>
where <server-name> is the DNS name for your TURN server configured in the last step.
certbot will ask you to create a DNS TXT record to verify that you have control over the DNS records for <server-name>. Follow the instructions and wait a few minutes before pressing Enter as DNS changes will take a while to propagate. Once you are done with this verification step Certbot will create your certificate and give you some output that looks like the following:
Successfully received certificate.
Certificate is saved at: /etc/letsencrypt/live/turn.markmizzi.dev/fullchain.pem
Key is saved at:         /etc/letsencrypt/live/turn.markmizzi.dev/privkey.pem
This certificate expires on 2024-12-24.
These files will be updated when the certificate renews.

NEXT STEPS:
- This certificate will not be renewed automatically. Autorenewal of --manual certificates requires the use of an authentication hook script (--manual-auth-hook) but one was not provided. To renew this certificate, repeat this same certbot command before the certificate's expiry date.

- - - - - - - - - - - - - - - - - - - - - - - - - - - - - - - - - - - - - - - -
If you like Certbot, please consider supporting our work by:
 * Donating to ISRG / Let's Encrypt:   https://letsencrypt.org/donate
 * Donating to EFF:                    https://eff.org/donate-le
- - - - - - - - - - - - - - - - - - - - - - - - - - - - - - - - - - - - - - - -
Note the locations that the generated certificate and the private key have been downloaded to (in my case /etc/letsencrypt/live/turn.markmizzi.dev/fullchain.pem and /etc/letsencrypt/live/turn.markmizzi.dev/privkey.pem respectively).
Note also the expiry date of the certificate. Certificates must be manually renewed by re-running the certbot command when they expire. You also need to reset the location of the renewed certificate and private key in /etc/turnserver.conf (if these are downloaded to a different location), and restart coturn. Certbot will send you a reminder email when your certificate is about to expire.
To install the certificate, set the following options in /etc/turnserver.conf (once again you may want to search within the file):
# SSL certificate
cert=<certificate-location>
# SSL private key
pkey=<pkey-location

tls-listening-port=5349
Configuring port forwarding over the router
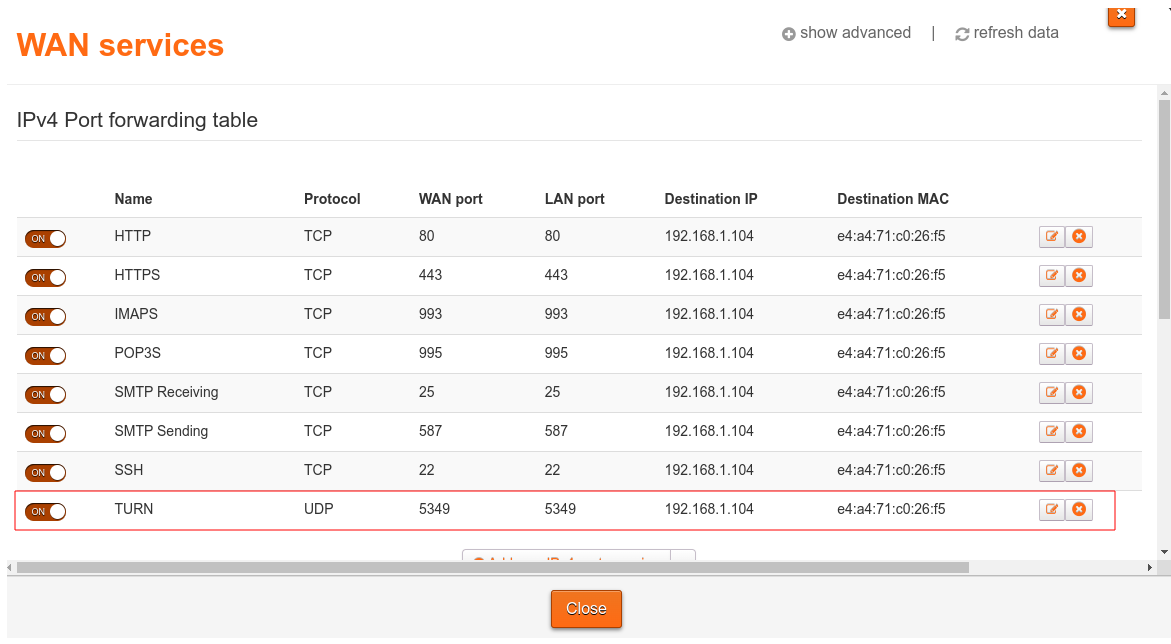
Port forwarding rules are required to use the TURN server over the Internet. TURN without SSL uses a default port of 3478 while TURN with SSL uses 5349 (see above). Ideally only the latter is exposed, as using TURN without SSL over the Internet is unwise.
Port forwarding is usually managed via a table which can be edited through the router interface (this is usually available by accessing the largest local IP address on your local network, e.g. for me it is available at http://192.168.1.254).
Here are my port forwarding rules as an example of what a setup could look like:
Authentication
No authentication
The TURN server can be configured with no authentication, meaning anyone can connect to it and use it as a relay.
This is the default, but can be enabled explicitly by setting
no-auth
in /etc/turnserver.conf.
Static users
The TURN server can also be configured with static users which are used by TURN clients to authenticate themselves.
To enable this, make sure the following settings are set in /etc/turnserver.conf:
# Enable long-term credential mechanism
lt-cred-mech

# Specify one or more users for the TURN authentification
user=<username1>:<password1>
user=<username2>:<password2>
# ...